Saturday, 9 July 2016

Westminster's Monuments to War

As regular readers of this blog will no doubt be aware, I have accumulated over the years a fairly vast collection of photographs recording London's 'footprints' of her wartime past. These take the form of signs for air raid shelters, emergency water supplies and occasionally the shelters themselves and other surviving wartime relics, such as shrapnel scarred buildings and wartime graffiti. Back in May 2013 I ran a short series of articles on this blog running through to August of the same year which detailed many of these and hopefully many Londoners and visitors to the capital have managed to discover at least some of these, perhaps by coming on one of our walks, or by exploring for themselves. The City of Westminster is home to some of these and walkers will have an opportunity to see some of them on September 18th 2016 when I shall be guiding a walk around the area's wartime past - booking details can be found on the main website.


Eagle Squadrons Memorial in Grosvenor Square (author's photo)

There are also many memorials and plaques to notable wartime events and personalites located across London. Many of these are sited in high profile locations and are probably well known to both Londoners and visitors alike but there are also many that are tucked away in lesser known places and today, we are going to explore some examples of both types of these.

St Clement Danes Church is well known today as the Central Church of the Royal Air Force, although it could be argued that the building itself is a monument to the Blitz, as it was destroyed in an air raid on the night of 10/11 May 1941. It certainly carries it's own 'honourable scars' in the form of some heavy duty shrapnel marks in the masonry at the Law Courts side of the building.

Shrapnel scars at St Clement Danes (author's photo)

In addition to the shrapnel scars, there are two statues commemorating key figures in the RAF's history standing guard outside the church. The first is of Air Chief Marshal Baron Dowding of Bentley Priory, who as Sir Hugh Dowding was one of the architects of British victory in the Battle of Britain in 1940, the first German defeat of the war and one which ensured that the RAF retained control of the skies over the British Isles, thus avoiding any serious prospect of a German invasion of this country. Born in 1882, Dowding who was nicknamed 'Stuffy' as a result of his seemingly somewhat aloof manner (in reality more down to shyness), was the first Air Officer Commanding of RAF Fighter Command and oversaw the introduction of an integrated system of radar backed up by human observers, raid plotting, radio vectoring of fighters, interlocking groups and sectors designed to reinforce one another as well as ensuring the introduction of modern, eight gun fighters in the form of the Spitfire and Hurricane. He also saw off challenges from others who tried to foist upon him  inferior aircraft such as the Defiant, making himself somewhat unpopular with some of his contemporary senior officers in the service. He was coming towards the end of his tenure at Fighter Command on the outbreak of war but fortunately for the country, was given an extension of service until late 1940, which ensured the British victory. His service rivals finally ensured that he was dismissed in November 1940 and after a brief and unhappy appointment to the USA on behalf of the Ministry of Aircraft Production and the production of a study into RAF manpower, he retired from the service in July 1942.

Baron Dowding's statue at RAF St Clement Danes (author's photo)


The other 'gate guardian' at St Clement Danes is an altogether more controversial figure and remains so to this day. Marshal of the Royal Air Force Sir Arthur Harris, known to his friends as 'Bert', to his Bomber Command crews as 'Butch' (short for Butcher) and to the wider world as 'Bomber' was the Air Officer Commanding of RAF Bomber Command from 1942 until 1945 and as such, oversaw the area bombing campaign of German cities. A long time proponent of aerial bombing, Harris was at first given command of 5 Group in September 1939 and took command of Bomber Command in February 1942 when it was at a low ebb. Early attempts at daylight, unescorted precision bombing had been disastrous and having switched to night bombing, navigation was found to be lacking, with only one in three aircraft getting within five miles of their intended targets. Harris reinvigorated his new command, placing greater emphasis on night flying techniques and pushed for the introduction of electronic navigation aids such as 'Gee' and 'Oboe' as well as improved radars. Harris also recognised that precision bombing at night was next to impossible, so resorted to Area Bombing of large cities, starting with a trial run on Lubeck in March 1942 and achieving a major publicity coup in May 1942 with Operation Millenium, a huge 1,000 bomber raid upon Cologne, in which he successfully gambled the entire force at his disposal to demonstrate his area bombing techniques. These culminated in Operation Gomorrah, a series of raids over seven days and nights in which the city of Hamburg was more or less erased from the map, with the loss of some 42,000 civilian lives. The destruction of Dresden in February 1945 with the loss of a further 25,000 lives was arguably the most controversial raid of the war and saw Churchill attempting to distance himself from the policy of area bombing, even though he had ordered the raid himself in order to assist the Russians in their advance from the east. Harris remained unapologetic about the policy and rightly considered the post war government's refusal to issue a campaign medal to his 'old lags' as he called his men, an outrage and refused to accept any peerage or higher honour himself as a protest. Bomber Command lost 55,573 men during the Second World War, the highest losses for any arm of the British Armed Forces. Harris was fiercely loyal to his men and despite the losses, they reciprocated the loyalty with interest. The controvery surrounding Harris continues to this day and when his statue was unveiled in 1992 by Her Majesty Queen Elizabeth the Queen Mother, it was vandalised within a day or so by someone throwing red paint over it. The statue has been defaced several times since but thankfully in more recent years, it has remained untouched.

Sir Arthur Harris's statue outside RAF St Clement Danes (author's photo)

There is also another figure from the wartime RAF commemorated not too far from St Clement Danes, who whilst not as controversial a figure today, certainly divided opinion within the Service at the time, although today almost all historians now believe his tactics were correct and indeed Lord Tedder, a former Chief of the Air Staff stated "If any one man won the Battle of Britain, it was him."

The "him" in question was Air Chief Marshal Sir Keith Park, AOC of 11 Group, RAF Fighter Command for the whole of the Battle of Britain. A New Zealander, Park was much beloved by his subordinates, having no 'side' to him at all, but was perhaps less loved by some of his contemporary senior officers. Maybe this was down to his being seen as a mere 'colonial' and maybe it was Park's straight talking and inability to suffer fools that caused this friction but there is no doubt that he did not see eye-to-eye with his counterpart in neighbouring 12 Group, Sir Trafford Leigh Mallory. The two men had diametrically opposite views on fighter tactics; Park believed in intercepting enemy formations as far forward as possible, using relatively small formations of fighters, whilst Leigh Mallory, encouraged by subordinates like Douglas Bader, was an advocate of the so-called 'Big Wing' in which as many as seven or eight squadrons would be formated together to attack in large numbers. Park had already experimented with large formations during the Dunkirk operations and had found them to be unwieldy. It took time to gather together such a large number of aircraft and by the time they had done so, the attacking bombers had often discharged their loads and were on the way home. Furthermore Bader, although undoubtedly a brave man, was something of a loose cannon and would often ignore instructions given to him by the ground controllers, preferring instead to look for the enemy where his 'gut instinct' told him they would be. Thus, when Park called upon 12 Group for assistance, as was their function, they would often not be in the right place, or sometimes not turn up at all. As a result of this, Park didn't trust Leigh Mallory, told him so and more importantly told Dowding so into the bargain.

Unfortunately for Park, Leigh Mallory was also jealous for control of 11 Group and his friend Sholto Douglas had envious eyes towards Dowding's position. Sholto Douglas was also used to the machinations of the Whitehall machine and used his political connections to make sure that the two men got their own way, with the result that with the Battle of Britain won, Park's reward was to be effectively sacked and relegated to Training Command. His replacement was Leigh Mallory, with Douglas manouvering himself into the top job upon Dowding's enforced retirement. Park was later moved to Malta, where using the same tactics as he used in the Battle of Britain, transformed the situation and stopped the air raids on the beseiged island within weeks of his arrival and later still in the war, commanded the Allied Air Forces in the Far East, replacing Leigh Mallory who had been killed in an air crash.

Sir Keith Park's statue in Waterloo Place (author's photo)

We continue the Royal Air Force theme for the moment and now look at a memorial that will only be seen by cricket lovers, located as it is at Lord's Cricket Ground but even so, it may be that many visitors to the Home of Cricket will have passed by without the unobtrusive bronze plaque on the famous Lord's Pavilion that tells us the ground was used by the Service as an Air Crew Reception Centre during the Second World War. Many of these men subsequently gave their life on operational service and the simple plaque reminds us that our continued enjoyment of cricket reflects their sacrifices.

Plaque outside the Lord's Pavilion (author's photo)


The Senior Service is also well represented in London and one of the most impressive reminders of their sacrifice is the Submariners' Memorial located on the Victoria Embankment. This takes the form of a large bas-relief which depicts the interior of a submarine, on either side of which is a plaque, one of which lists the submarines lost in the First World War and the other which lists those lost in the 1939-45 conflict. Submariners are a special breed and in wartime especially, worked and fought in incredibly difficult circumstances with little chance of escape should their vessel be sunk. Perhaps in recognition of this, the submariners hold their own special Memorial Walk and wreath laying service on the Sunday preceeding the country's main Remembrance ceremonies.

The Second World War panel on the Submariners' Memorial (author's photo)


Close to the Submariners' Memorial is another reminder of the Second World War, in the form of HQS Wellington, formerly His Majesty's Ship of the same name. Now the floating livery hall for the Honourable Company of Master Mariners, HMS Wellington was launched in 1934 at Devonport Dockyard as a Grimsby Class Sloop and during the War escorted many Atlantic and Gibraltar convoys, sharing in the destruction of a single U-Boat, as well as assisting in the evacuation of Allied troops from Le Havre in June 1940. Decommissioned following the end of the War, she was converted for her new role at Chatham Dockyard, which included the removal of all her machinery spaces, which were converted into the main livery hall area of the vessel. A drydocking and refurbishment in 1991 means that her existence should be assured for the forseeable future and we can only but wonder how many people driving, cycling or jogging past the smart, white painted ship realise that they are passing a veteran of the Battle of the Atlantic.

HQS Wellington at her berth on Victoria Embankment (author's photo)

Just downstream from HQS Wellington there was until quite recently, another veteran from the war at sea, this time from the previous conflict, in the shape of HMS President, formerly known as HMS Saxifrage, a Flower class sloop dating from January 1918 and which saw active service escorting Atlantic Convoys. She was also known as a 'Q Ship', and was superficially disguised to look like a merchant ship, with her guns hidden from view. The idea was that German U-Boats would surface to engage with guns what was thought to be an easy target, only for the Q Ship to then reveal her true identity and use her overwhelming fire power to sink the submarine. In this guise, the ship's log of the Saxifrage records that she engaged nine U-Boats in her wartime career. Being completed right at the end of the war, HMS Saxifrage's service was brief and she was of little use to the peacetime Royal Navy. In 1922, she was moored permanently on the Victoria Embankment, renamed President and used as the Drill Ship for the London Division, Royal Navy Reserve, a role which she fulfilled until 1988, when she was decommissioned upon the opening of a shore establishment by the same name located slightly further downstream at St Katherine's Dock. The vessel was until recently used as a wedding and corporate venue, being latterly painted in a frankly awful approximation of a wartime 'dazzle' camouflage scheme but earlier this year, she was towed down to Chatham Dockyard pending a refurbishment which will hopefully see her return to a berth in the capital in time for her centenary in 2018 and also we must hope, in a more appropriate colour scheme.

HMS President at her former berth on Victoria Embankment (author's photo)

Apart from the Senior and Junior Services, the British Army is also well represented in Westminster in the form of numerous plaques and statues, covering all aspects of the service from the early days of defeat and evacuations, through to the winning years of 1944-45.

Lord Gort's Blue Plaque at 34 Belgrave Square (author's photo)

John Standish Surtees Prendergast Vereker, perhaps better known as Lord Gort, was the Commander in Chief of the British Expeditionary Force in France in 1939-40. He was undoubtedly a brave man, as the award of a Victoria Cross at the Battle of Canal Nord in 1918 testifies but as a commander, he was not possessed of the greatest brain power. Gort had reached the pinnacle of the British Army, being appointed it's professional head, the Chief of the Imperial General Staff in late 1937. In normal times of peace, it would have been his final appointment before an honourable retirement but on the outbreak of war in 1939 and the formation of an Expeditionary Force to fight alongside the French, as was the custom, the command of this formation went to the CIGS. Gort's command position was not the easiest, being under the orders of the numerically superior French but in time of crisis, still having the latitude to act as he thought best in accordance with the British national interest. This came to a head in May 1940, when the French Army and political leadership, largely paralysed through defeatism, seemed incapable of mounting a counter attack. The truth was that both armies were largely living in the past and seemed to think that the war in 1940 would take a similar shape to the previous conflict. Nevertheless, Gort displayed great moral courage in ordering a withdrawal to the sea and aided by skillful generalship and cool heads from the likes of Generals Brooke, Montgomery and Alexander, as well as other up and coming younger Generals, the BEF were able to extricate the majority of it's manpower (although not much of it's equipment) through Dunkirk and the other Channel ports in a series of evacuations. Gort was never given another field command after Dunkirk; Churchill tentatively put his name forward as Auchinleck's successor in North Africa but the CIGS, by now General Alan Brooke and who had served under Gort in France, was having none of it and vetoed the idea. Instead a succession of Governorships followed, first Gibraltar from 1941-42, then Malta from 1942-44 where his leadership during the siege made a great impression on the Maltese people. His final appointment was as High Commissioner for Palestine and Transjordan. It was during this tenure that he first displayed symptoms of an illness which turned out to be liver cancer. It was not diagnosed correctly on a visit to the UK in early 1945 and it was not until he returned to England permanently that he was admitted to Guy's Hospital, where his condition was finally diagnosed, by which time it had become inoperable. He died at Guy's on 31 March 1946. The English Heritage Blue Plaque pictured above is located at his former home at 34 Belgrave Square in London SW1.


The Guards Memorial with it's 'honourable scars' in Horse Guards Parade (author's photo)

A more general memorial exists in Horse Guards Parade, where it must have been seen by hundreds of thousands of people since it's unveiling in 1926. The 'cenotaph' feature was designed by H Chalton Bradshaw, whilst the bronze figures of Guardsmen were designed by Gilbert Ledward. Each figure represents one of the Guards Regiments, the Grenadier, Coldstream, Scots, Irish and Welsh Guards and each figure was modelled on a serving guardsman of the time. So from left to right we have Sgt R Bradshaw MM of the Grenadiers, Lance Cpl JS Richardson of the Coldstream, Guardsman J McDonald of the Scots, Guardsman Simon McCarthy of the Irish and Guardsman A Conley of the Welsh Guards. There are some who think that the Household Division are merely ceremonial troops but the memorial serves to remind us that they were and remain an integral part of the fighting strength of the British Army and their losses in two World Wars as well as subsequent conflicts upto and including Afghanistan are due testament to that fact. The memorial itself has it's own 'Honourable Scars' inflicted by shrapnel damage from a High Explosive bomb falling nearby in October 1940 which are clearly visible to this day.

As we might expect, our Allies during the Second World War are also well represented in London. General Wladyslaw Sikorski had been an integral part in the formation of a free and independent Poland during the Polish-Soviet war of 1918-1921 and had become an almost legendary figure amongst the Polish people for his exploits during that conflict. He had subsequently briefly been Primer Minister in 1922-23 and had also played a large part in the organisation of the Polish Army. Following the coup organised by Josef Pilsudski in 1926, Sikorski declared his opposition and was susbequently relieved of his Army command in 1928 and went into retirement and semi-exile in Paris. Following the German invasion in September 1939, Sikorski pressed unsuccessfully for a command and escaped back to Paris via Romania, where he formed a Government in Exile with Wladyslaw Raczkiewicz as President and Stanislaw Mikolajczyk. Sikorski was invited by the President to become Prime Minister. Despite their defeat, the Poles still commanded considerable forces that had escaped to France and Great Britain. Almost the entire Polish Navy had escaped, as had large numbers of airman and several divisions of the Polish Army. Following the fall of France in June 1940, Sikorski rejected a proposal by Marshal Petain that Poland should capitulate along with the French and the Government in Exile, followed by many thousands of Polish servicemen, escaped to Great Britain. Following the invasion of the Soviet Union in June 1941, tens of thousands of Polish prisoners were released and made their way to British controlled North Africa, where they fought with great distinction. The Soviet change of heart came too late for the 20,000 Polish Army officers who had been murdered by the Soviets and buried in the Katyn Forest. This atrocity by the Soviets would weigh heavily on Sikorski's heart as well as upon future Soviet-Polish relations. Sikorski himself died in an air accident when his Liberator bomber crashed on take off from Gibraltar. He had been returning from an inspection of his troops in North Africa and his death remains controversial to this day; the Soviets had broken off diplomatic relations with Sikorski's Government in Exile and conspiracy theories abound about his possible assassination by the Soviets. Nothing was ever proved although his death had a profound effect on Allied-Polish relations, with no subsequent Polish leader having anything like Sikorski's influence with the Americans and British. Sikorski was buried at the Polish War Cemetery at Newark on Trent, although with the formation of a free and democratic Poland following the collapse of the Soviet Union, his remains were exhumed and transported to a new grave at Wawel Castle in Kracow. His statue pictured below is in Portland Place and was unveiled in 2000.

General Sikorski's statue in Portland Place (author's photo)

No collection of War Memorials in Westminster would be complete without mention of our American Allies. There are too many to mention here but one of note is located outside the American Embassy in Grosvenor Square. Many readers will be aware that the embassy is scheduled to move to a new location at Nine Elms, south of the Thames at some point in 2017 and it is unclear whether the various memorials outside the current embassy, including statues of President Franklin D Roosevelt and General Dwight D Eisenhower, will move with the embassy. The one pictured at the top of the page is that to the American Eagle Squadrons, formed in 1940 in Great Britain. This was prior to America's entry into the war and although too late to serve in the Battle of Britain, they served with great distinction as part of the RAF until formally turned over to American control in September 1942. Only 244 Americans actually served with the Eagle Squadrons and although they never renounced their American citizenship, they wore RAF uniform and rank insignia with an Eagle Squadron emblem proudly displayed. Some of the recruits had already been rejected by the USAAF as unsuitable for flying duties and took great pleasure in proving this decision wrong, whilst others had intended to initially fight for the Finns against the Soviets or for the French against the Nazis. They all eventually gravitated to England and some of the stories of how they reached this country were quite epic in their own right.

Eagle Squadron insignia (author's collection)

71 Squadron was the first of the Eagle Squadrons to be formed, in September 1940 but was not declared operational until February 1941 at RAF Church Fenton. The second unit was 121 Squadron at RAF Kirton-in-Lindsay in February 1941, with the final one, 133 Squadron being formed in July 1941 at RAF Coltishall. Upon transfer to the American Eigth Air Force in September 1942, the squadrons were re-numbered as the 334th, 335th and 336th Fighter Squadrons respectively, initially retaining their Spitfires until re-equipped with P-47 Thunderbolts in January 1943. During their time with the RAF, they had earned twelve Distinguished Flying Crosses and one Distinguished Flying Order. At the insistence of the men themselves, all of the original RAF Eagle Squadron pilots continued to wear their RAF pilot's 'wings' alongside their new American insignia. Of the original thirty four pilots from 1940, only four of them were able to transfer to American control. The remainder had either been killed or captured.

There are many other statues and memorials in Westminster commemorating our other staunch allies, including the Australians, Canadians, New Zealanders as well as the French and the Dutch, as well as many memorials to our own various arms of the Civil Defence Services. There are also many others outside Westminster and in our next article will try to cover some more of these.

 
Published Sources:
 
Bomber Harris: His Life and Times - Henry Probert, Greenhill Books 2003
Dowding of Fighter Command - Vincent Orange, Grub Street 2008
Dunkirk: Fight to the Last Man - High Sebag-Montefiore, Viking 2006
Park - Vincent Orange, Grub Street 2001 
Sloops 1926-1946 - Arnold Hague, World Ship Society 1993
War Diaries 1939-1945; Field Marshal Lord Alanbrooke - editors Alex Danchev and Daniel Todman - Weidenfeld & Nicolson 2001






Friday, 17 June 2016

The Cap Arcona - A very private tragedy

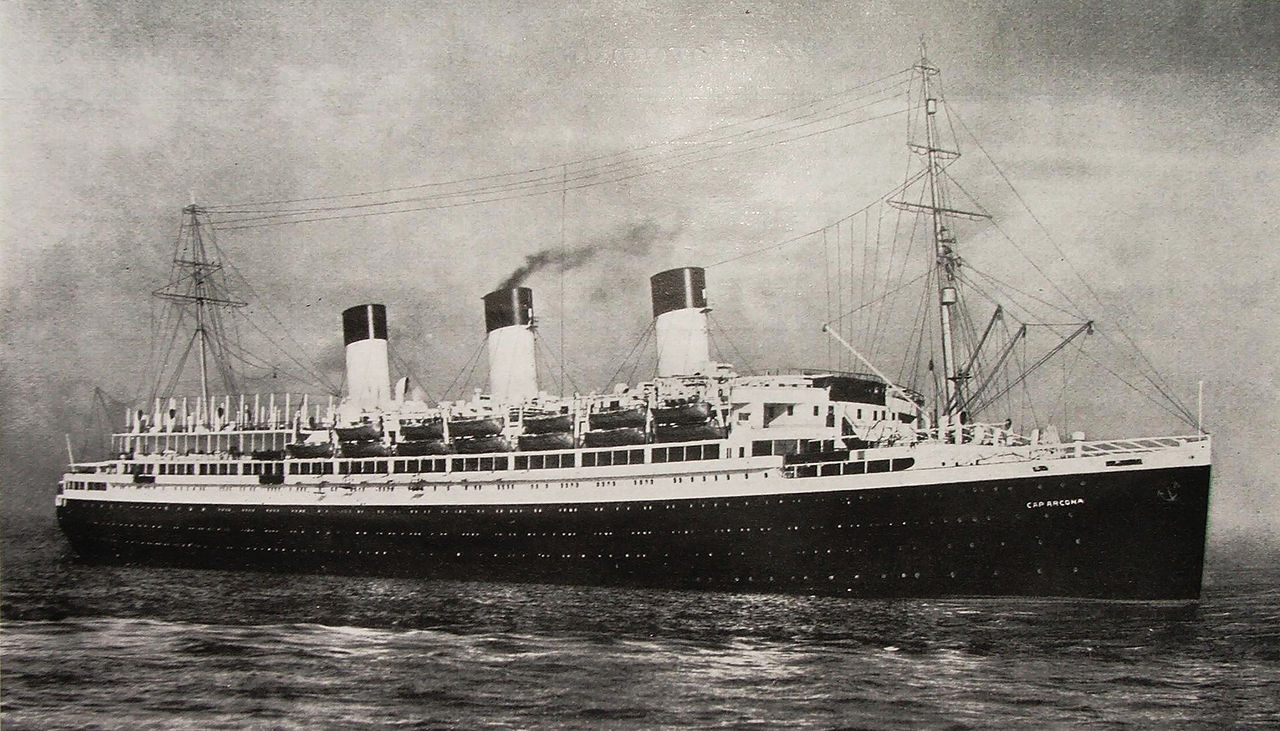
ss Cap Arcona - (postcard view - author's collection)

Over the years, apart from the Blitz, this blog has looked at many other aspects of Second World War including some of the many tragic occurrences during the War at Sea that inevitably involved civilians or other innocent parties. These events included the loss of Italian prisoners of war aboard the Arandora Star which we looked at in July 2010, soldiers of the British Expeditionary Force and other refugees aboard the Lancastria which was covered in May 2011 as well as the loss of the Athenia carrying Americans attempting to escape the outbreak of war in Europe. 

All of these tragedies have involved British vessels which were sunk by German forces and which with the exception of the 'own goal' involving the Arandora Star and her 'cargo' of Italian POWs, all of the victims were either British, Allied or in the case of the Athenia, neutral citizens as the Americans were at that very early stage of the war. 

It is often overlooked that German ships carrying evacuees of that country, both military and civilian were sunk, with massive loss of life during the latter days of the war. One such vessel, the Wilhem Gustloff  was sunk by a Soviet submarine in January 1945 and holds the melancholy record of being the greatest maritime disaster in history, with deaths estimated at over 9,300, including some 5,000 children. This story is about to be recounted by the renowned author Roger Moorhouse in a forthcoming book and will be reviewed here in due course. There was another disaster, a very private tragedy which has been frequently overlooked, which occurred right at the very end of the war in Europe on 3rd May 1945 and which involved the most hapless and helpless of all possible victims - concentration camp prisoners from Neuengamme.

Before the war, the steamship Cap Arcona had been known as the 'Queen of the South Atlantic' and was the largest and fastest vessel of the Hamburg South America Line's service between Hamburg, Buenos Aires and other ports on the eastern coast of South America. Entering service in 1927 and built at the famous Blohm + Voss shipyard in Hamburg, she could carry 1,315 passengers, including 575 in First Class, whose passengers enjoyed excellent cuisine, comfortable accomodation and amenities such as a full sized tennis court.

In 1940, the Cap Arcona was requisitioned by the Kriegsmarine and sent to Gotenhafen, the Nazis name for Gdynia in occupied Poland, where she was used as an accomodation ship. In 1942, she was used as an enormous film prop in a Nazi production about the sinking of the Titanic. In 1945, she was used as part of Operation Hannibal, the evacuation of German military personnel and civilians from East Prussia, which was being steadily overrun by the advancing Soviets. This was the same operation that claimed the Wilhelm Gustloff mentioned above. The Cap Arcona was able to evacuate almost 26,000 people to the relative safety of Hamburg and occupied Denmark in several voyages. These voyages were fraught with danger and apart from the Gustloff, over 150 other vessels fell prey to Soviet submarines and other naval craft. So stressful were the conditions that on 20 February 1945, Johannes Gertz, the Captain of the Cap Arcona, shot himself in his cabin rather than face another such voyage. By the end of March 1945, the old liner had made her final voyage to Copenhagen. She was worn out and could not be made properly seaworthy other than by a complete refit, which was impossible in the conditions prevailing in a Third Reich which by this time was in it's death throes.

A Neuengamme inmate being used for 'Bomb Disposal' work in Hamburg - August 1943 (Mahnmal St Nikolai)

There was however, one final, shameful, mission in store for the battered old liner - the evacuation of prisoners from Neuengamme Concentration Camp, near Hamburg. Established in 1938, Neuengamme was estimated to have held a total of some 106,000 prisoners during it's existence, of whom about half were estimated to have perished. By the end of 1944, the number of prisoners was estimated at around 49,000 with about 12,000 at Neuengamme itself, with the remainder held at subsidiary camps in the surrounding area. The British had already discovered and liberated Belsen Concentration Camp and had made public the worst excesses of the Nazi regime. Heinrich Himmler, Reichsfuhrer SS, and the man ultimately responsible for these camps, still harboured delusions of being able to cut a separate deal with the British and Americans with himself as head of state of a Germany that would soon be fighting the Russians alongside the Western Allies. Such was his delusion, he was determined that no further camps would fall into the hands of the British or Americans and that all inmates would either be evacuated into Sweden, through the White Bus scheme, brokered by the Swedish Red Cross, or quietly placed aboard vessels such as the Cap Arcona, where they were placed below decks with the eventual intention of moving them to a new camp in Norway. The White Bus operation had initially been aimed solely at Scandinavian inmates and although quickly expanded to include other nationalities, the majority of those imprisoned aboard the Cap Arcona were Poles, Latvians and other Eastern Europeans.

Whilst Himmler in Berlin had given the order to remove the remaining inmates, the actual execution of the plan fell to others. Karl Kaufmann was the Nazi Gauleiter for Hamburg and it was he that came up with the idea to move the inmates to the Cap Arcona and three other vessels that were anchored and empty in Lubeck Bay. He felt that these vessels would be ideal for the task and perhaps he felt that they could be quietly sunk, with their human cargo onboard and thus removing any evidence to the soon to be arriving British.

It was 26 April 1945 when the first batch of prisoners were brought on board Cap Arcona but unlike the vessel's pre-war passengers who were given only the finest service, these poor unfortunates were herded deeper and deeper into the ship's holds, which never having been designed for this function, were cold, damp and unsanitary. The SS guards took great care to remove all life belts, rafts and anything else that could aid a drowning person. It was the same story aboard the other vessels and although various rumours filtered amongst the prisoners that they were being embarked as a prelude to evacuation to neutral Sweden, something which Gauleiter Kaufmann himself declared after the war at his War Crimes trial, the fact that none of the ships had been declared to the Red Cross, or had been given appropriate markings, it is hard to believe that this was a credible option. It becomes even less believable when one remembers the condition of the Cap Arcona and the other vessels as being barely seaworthy.

On 1 May 1945, the vessels anchored in Lubeck Bay had caught the attention of the RAF when the pilot of a Hawker Typhoon of 83 Group reported that an evacuation fleet was gathering off Lubeck. As the ships hadn't been declared to the Red Cross, the answer to the RAF Intelligence officers was simple - the British Army were closing in and the Germans were seeking to evacuate to Norway in order to continue the fight. The seeds of tragedy had been sewn.

On 2 May 1945, the British reached Lubeck and discovered the now empty Concentration Camp at Neuengamme. Because Lubeck had been used as an evacuation port, it contained an office of the International Committee of the Red Cross and the representative here, Mr De Blonay, informed Major General 'Pip' Roberts of 11th Armoured Division of his understanding that between 7,000 and 8,000 prisoners were detained on board the ships anchored in Lubeck Bay.

On board those ships, hopes amongst the prisoners began to rise; earlier on 2 May, the final prisoners were brought on board by barge, this time from another camp near Danzig and although many of them had died on the voyage due to the appalling conditions on the barges, the survivors were brought on board the Cap Arcona, which now had over 4,500 crammed inside her holds. Captain Bertram, the ship's captain refused to take any more prisoners and vehemently informed the SS Guards as much. Whilst these final prisoners were being loaded, firing could be heard ashore and the SS Guards, were becoming jumpy and visibly scared as perhaps their thoughts turned to what might happen to them once their human cargo was discovered by the advancing British soldiers.

Despite the fact the Major General Roberts had been made aware of the possibility of prisoners being aboard the ships in Lubeck Bay, the war was now moving too fast for information to filter through and RAF operations against shipping in the Baltic had gathered their own momentum and as far as the pilots of 83 Group were concerned, the ships contained elements of the hated SS or important Nazis fleeing either to the new seat of government in Flensburg or trying to escape to neutral Sweden.

Monument to Cap Arcona victims at Neustadt (Waterproof947)

So it was on the morning of 3 May 1945, Typhoons of 184, 193, 197, 198 and 263 Squadrons dived in to attack the assembled fleet. Each of the renowned ground attack fighters carried four 20 mm cannon and either two 500 lb bombs or eight 60 lb unguided rockets. As the attack began, the SS guards began to abandon ship, unlocking the life preservers that they had saved for themselves and jumping over the side. Some prisoners managed to get themselves on deck and one, Erwin Geschonneck, a German political prisoner, witnessed a man armed with a machette, flailing his way through the crowd and cutting down anyone who impeded him; this was Captain Bertram, who together with his crew and officers, were amongst the first over the side. Geschonneck also witnessed one SS man, armed with two revolvers, firing off his guns until the ammunition was spent, at which point he was overrun and trampled to death by his former prisoners, more and more of whom had managed to break out of the holds and reach the deck.

By now the Cap Arcona was ablaze and those who could not reach the deck and were trapped below were consumed by the flames in appalling scenes. Many of those in the sea fared little better; a small fleet of rescue boats approached the burning ships but any prisoners hoping for rescue were invariably shot as the boats were being sent to rescue SS guards and crewmembers only. Fortunately, some managed to get themselves picked up, whilst others struggled ashore, where they were 'greeted' by German sailors, some of whom were as young as 16 years of age. Fortunately, these sailors looked after the survivors and later that same day, they were liberated by the British.

The few that made it ashore were in a very lucky minority. Of some 8,500 prisoners on board the Cap Arcona, Deutschland and Thielbek, at least 7,500 perished, although the actual number will never be known. It is thought that some thirty nationalities were on board the prison ships and as well as men, women and children from all of the Nazi occupied countries, there were also victims from American, Britain and Canada, as well as Swiss, Spanish and Italians. Victims were washed ashore for weeks after the attacks and are today buried in mass graves at Neustadt, Scharbeutz and Timmerdorfer Strand. Human remains were still being washed up as recently as 1971.

Even 71 years after the end of the war, which came just days after the "Shipping Strike" attack, this remains a little known tragedy, the result of a genuine mistake casued by the fog of war at the end of the European conflict.


Published Sources:

Monty's Greatest Victory: The Drive for the Baltic April-May 1945, Charles Whiting, Pen & Sword 2002

Unpublished Sources:

197 Squadron Operations Record Book - National Archives Kew AIR 27/1169/53


Monday, 9 May 2016

Book Review: The Silent Deep - The Royal Navy Submarine Service since 1945

The Silent Deep (Author's image)

As regular readers know by now, this blog is usually strictly devoted to events during the wartime years of 1939-45, so this particular article is going to break new ground as it deals with much more recent history including the Cold War and the Falklands Conflict amongst others. I've decided to break with precedent as the book in question is such an important and interesting piece of work about a group of men for whom I have the utmost respect and admiration - the men of the Royal Navy Submarine Service, or RNSS to use one of the many acronyms that appear in the book.

The Submarine Service is traditionally known as "The Silent Service", such is it's aversion to self-publicity. Indeed to this day, the standard response to any questions made through official channels is that "The Ministry of Defence does not comment upon submarine operations."

Peter Hennessy, one of our most respected historians and James Jinks, also an accomplished historian and former PhD student under Hennessy, have compiled an authoritative and well-reserched history of the post-war Submarine Service, in which they not only examine the men who commanded and manned the submarines but also look at the vessels themselves, the rationale behind the various policy decisions such as the procurement of Polaris and Trident, as well as describing in compelling detail some of the Cold War exploits of the submarines and submariners, as well as the actions of the RNSS during the Falklands War, thus far and hopefully, the only time that a nuclear submarine has fired torpedoes in anger against an enemy maritime target.

The book opens with a description of the 'Perisher' , or as it is correctly described, the Submarine Command Course, a five month ordeal held twice yearly through which any potential Royal Navy submarine commander must pass. It is designed to replicate the relentless pressures piled upon a submarine captain and failure to pass the course means that the candidate's career aboard submarines is over. He will never again set foot aboard a Royal Navy submarine. Faced with the ruthlessness of the course, it is no surprise that the Navy's submarine captains are universally recognised as being the best in the business. The authors describe some of the goings on aboard HMS Tireless during the 'Private War' which forms part of the course and during which the aspiring commanders are put through their paces.

The course is so well respected that allied navies, including the US Navy frequently send their own top commanders to take part and indeed the late Tom Clancy, author of The Hunt for Red October once wrote that Royal Navy submarine commanders are feared, even by the US Navy. He explained thus:

"Note that I use the word 'fear.' Not just respect. Not just awe. But real fear at what a British submarine, with one of their superbly qualified captains at the helm, might be capable of doing."

From an American, praise indeed but as the authors explain in this book, it was another American, Admiral Hyman Rickover, who was largely responsible for the Royal Navy going along the nuclear submarine route in the first place.

In the years immediately following 1945, the Royal Navy made do with it's fleet of wartime submarines, the diesel powered 'T' and 'A' Class boats (submarines are always 'boats' within the Navy) and these old warriors, such as HMS Totem found themselves being modernised by a cash-starved Navy and adapted for Cold War intelligence gathering missions, including early forays into the Barents Sea and beneath the Artic ice, operations which pushed these boats and the crews to the very limit. These diesel powered boats were known as SSKs (Submarine Killers) as apart from their intelligence gathering duties, their wartime mission would be to shadow and 'take out' Soviet submarines. It was soon clear though that these ageing boats would be no match for the newer and faster Soviet nuclear submarines and that an alternatives method of propulsion was needed, as well as developing a new class of diesel powered submarines, the Porpoise Class, which began to appear in the mid 1950s.

At first the Navy demurred from taking the nuclear powered route, partially on grounds of cost and partly because of worries about the UK's capability of producing sufficent fissile materials to power submarines and meet the country's weapons requirements. Instead, the Ministry of Defence at first explored the possibility of using Hydrogen Peroxide, or HTP as a means of propulsion. This method was being actively explored by the Germans at the end of the war and indeed a captured U-Boat, renamed HMS Meteorite was used for tests. This was followed by two experimental submarines HMSs Explorer and Excalibur, which given the fearsome reputation for the highly unstable and extremely dangerous propellant, were quickly given the nicknames Exploder and Excruciator. The Navy's HTP experiment came to an abrupt end when an HTP powered torpedo aboard the submarine HMS Sidon exploded on 16 June 1955, causing the loss of the submarine as well as the deaths of twelve men as the boat sank in Portland Harbour.

Detail on the Royal Navy Submarine Memorial (Author's photo)

Following this disaster, the Royal Navy turned to their American allies for help in producing their own nuclear powered submarines, or SSNs to use another of the many acronyms in the book. Admiral Hyman Rickover was known as the 'Father of the Nuclear Submarine' and it was indeed largely down to his remarkable drive and single mindedness that the US navy had gotten the USS Nautilus into service in 1955, the same year that the Royal Navy finally abandoned their ill-fated HTP project. Rickover was rude, arrogant and an extremely unpleasant man to deal with but one who recognised the importance of encouraging the Royal Navy to join the 'Nuclear Club' and thus provided every assistance to them in achieving this aim, albeit sometimes a seemingly grudging assistance. However, he did form a close relationship with Lord Louis Mountbatten, at that point First Sea Lord, the professional head of the Royal Navy. 

Rickover agreed to supply the British with an American reactor for the first Royal Navy submarine, named HMS Dreadnought, in order to give British industry a chance to catch up and perfect techniques of manufacture for their own reactor, which would go to sea in the second British SSN, HMS Valiant. Dreadnought, a hybrid British and American design with a 'British' fore end and an 'American' aft end, which contained the reactor, entered service in 1963. Despite some quirks, including a 'Checkpoint Charlie' sign that provided the demarcation point between British and American methods of working in the boat's two halves, Dreadnought proved to be a success and a quantum jump over any previous British submarine. Her appearance began a slow but steady stream of British SSNs coming into service which were able to take over the task of shadowing Soviet submarines and intelligence gathering, invariably in the Soviets' own backyard, the Barents Sea and Arctic Circle.

The book then concentrates on the Nuclear Deterrent, the acquisition of Polaris and the transfer of the UK's independent deterrent from the RAF to a new class of ballistic submarine, or SSBN and the establishment of what has been a continuous series of patrols beginning with that of HMS Resolution in 1968, which continues to this day with the Vanguard class and which is likely to continue into the 2050s with the so-called and as yet un-named Successor class boats (even a 17,500 tonne 'bomber' submarine is called a 'boat' in the Royal Navy!)

The authors tell of an amusing story describing the uncertaintly as to whether the incoming Labour government in 1964 would continue with the programme and a contingency design to convert the as yet unbuilt SSBNs into SSNs by using as much of the already procured materials as possible, thus averting waste. The nickname for this hastily redesigned submarine (and one which was never revealed to the new Prime Minister) was HMS Harold Wilson but it was a vessel which never sailed as the new government, largely driven by then Defence Secretary Denis Healey, decided to continue with the programme, albeit reduced from five boats to four, the minimum number that could safely constitute a continuous at sea deterrent.

The book continues to describe the design and entry into service of the next class of SSN, the Swiftsure class, followed by the Trafalgar class before going on to describe in some detail the submarine operations around the Falkland Islands in 1982, which culminated in the sinking of the Argentinian cruiser General Belgrano and the ultimately unsuccessful attempts to locate and sink the aircraft carrier 25 de Mayo.

The authors go on to describe subsequent submarine operations following the end of the Cold War, including actions against Libya, Afghanistan and both Gulf Wars before covering the latest class of SSN to enter service, the Astute class and gives some useful insight into the Successor SSBN programme.

The book closes where it began, aboard HMS Tireless and provides a quite moving description of the decommissioning ceremony of one of the Royal Navy's Cold War warriors and tells us something of the difficulties in disposing of nuclear submarines that have been taken out of service.

This volume is a truly magisterial piece of work and the casual reader should not be put off by what at first glance may appear to be a mass of diagrams, acronyms and naval jargon, for this book contains a great deal more than that and indeed a great deal more than my brief descriptions shown above. It tells the stories of the reasons behind the decision making, the ships and most importantly of the men - the submariners themselves. Truly a breed apart and a group of men to whom we should be profoundly grateful for helping to keep us safe over the past seventy years or so. I thoroughly commend this book to you.

The Silent Deep: The Royal Navy Submarine Service since 1945 is written by Peter Hennessy & James Jinks and is published by Allen Lane in hardback at a price of £30.00


Monday, 18 April 2016

Richard Hannaway, Bill Watson and the unknown Baby - a story of The London Blitz

The Daily Mirror headline from 9th September 1940 (Kay Evison)

One of the more gratifying aspects of writing this blog is receiving feedback from around the globe and learning about hitherto unknown or forgotten aspects of the Blitz and the Second World War from relatives of the people involved. In the past, I have heard from readers in the USA, Australia, South Africa and Canada, as well of course, from closer to home here in the United Kingdom.

The latest correspondence came via our Facebook page and was from Kay Evison in New Zealand and read as follows:

"Hi there I am new to this group and I am doing some research on my grandfather who was an ARP hero during the Blitz.

I now know my grandfather lived in 34 Pigott Street, Limehouse, for about 5 year from 1936 until 1940 and was an Air Raid Warden. His name was William Watson (which wasn't his real name) and he was in his 40's when she first met him. My grandmother would have been about 19 at
the time she first met him, ironically he deserted her before she had her baby in 1935 (my father, he was adopted by his grandmother in Bristol.) My grandmother then went on to work as a short hand typist at the Lewisham NAAFI to help support her family. I have for some time now been trying to find out more about my grandfather as this was the biggest family secret ever and anyone who knew anything has now passed on. I would like to find out his nationality and date of birth to further my research, I couldn't find him on the 1939 register although I found details of him on the Electoral rolls. (I have located the relatives of the boy Richard Hannaway in the story and the attached newspaper clipping has been passed onto his relatives (he died in 2012) and hope to hear more from them. His family lived in 33 Pigott Street.

I would love to hear from anyone who recognises which street the birth occurred in as I would love to find the child of the lady in the cutting but she was only recorded as Mrs R Foster. Her husband was also an ARP Warden."


The newspaper cutting from the Daily Mirror is reproduced above, courtesy of Kay and the story makes remarkable reading. Given the date of the cutting, 9th September 1940, one can easily surmise that the incident took place on the night of 'Black Saturday' 7th September 1940 - the first night of the London Blitz, when the East End bore the brunt of the bombing which killed 448 Londoners and left large areas of East and Southeast London in ruins.

Rose (we are not certain of her first name) Foster was heavily pregnant and in bed when the raid started. She was waiting for an ambulance to take her to hospital but the raid developed and she found herself stranded in bed about to give birth. One of the puzzles from this story is exactly where was she located? 

The location of the horse trough circled - Pigott Street runs to top right of the map (Mick Lemmerman)

There is someone by the name of R Foster mentioned on the Electoral Register but she was located a tidy distance away in Milward Street, close to the London Hospital. We know that Richard Hannaway, the little boy mentioned in the article, lived at 33 Pigott Street, opposite Bill Watson at number 34 and was bringing water from a nearby horse trough in order to wash the baby.

The location of the horse trough was located courtesy of a brilliant piece of local detective work by another follower of the blog, the author  and Isle of Dogs historian Mick Lemmerman, two of whose books on the Blitz have been reviewed here in October 2015 and February of this year. Mick worked out the location of the horse trough as being in the middle of Commercial Road at the junction with West India Dock Road as he recognized the public loos seen in the photograph!

From that piece of deduction, we now know that young Richard had run to the end of Pigott Street to the horse trough in Commercial Road; a relatively short distance but considering the fact that bombs would have been falling and shrapnel flying through the air, this was an incredibly brave act for anyone under fire, let alone a thirteen year old boy.

The extract from the Daily Mirror tells us that despite "never having done anything like this before" Bill brought the baby girl safely into the world and that she and her mother were both doing fine.

The article also mentions a bomb falling about eighty yards from the house which actually blew off the roof. A check of the LCC Bomb Map for Pigott Street reveals that it suffered from what looks like at least one direct hit and that several properties were destroyed as well as more that were seriously damaged. Amongst those properties seriously damaged was Richard Hannaway's house at number 33 (immediately to the right of the church in Pigott Street) as was Bill Watson's house directly opposite. Could it be that Rose Foster was visiting or living with Richard's parents when she went into labour?

The Bomb Damage Map for Pigott Street (Author's image)

It sort of adds up - perhaps Richard Hannaway was sent out by his Mum to get water to boil for the soon to be born baby and encountered his neighbour 'Uncle Bill' Watson and enlisted his help. Sadly, Richard passed away in 2012 and so far, Kay has been unable to trace the family of Rose Foster or to ascertain whether the baby is still alive, which given that she would now be 75, is quite possible.

Kay is also anxious to learn more about her Grandfather Bill Watson, who appears to have had something of a mysterious past. As can be seen from Kay's original communication, William Watson wasn't his real name and his nationality was also something of a mystery, although he was obviously an accepted part of his local community, being known as 'Uncle Bill' to all the local children.

Hopefully, one of our many readers around the world can throw some more light on this puzzle - it would be wonderful if a member of the Foster family could read this, or perhaps someone who knew or was related to Bill Watson. The power of the internet is remarkable, so we live in hope!

I am indebted to Kay Evison for contacting me and also to Mick Lemmerman for his local knowledge and insights into the area's social history.


Thursday, 18 February 2016

The Tide of Change

Enderby's Wharf 1946 (Dave Wood @liverpoolimages)

Whilst browsing through Twitter the other evening, I came across a photo posted by Dave Wood of the Greenwich Riverside in 1946. More precisely, the photo features the old Telcon Works at Enderby's Wharf, which is nowadays the proposed site of a Cruise Ship Terminal, which would have been unimaginable in those days when London was a working, industrial city. It shows a glimpse of a busier and more industrialised Thames than we are now accustomed to as well as a fascinating panorama of part of the Greenwich Peninsula in the immediate post-war era, when the scars of the Blitz were fresh, both on the ground and no doubt in the memories of those who had experienced it first-hand.

The Telcon Works runs vertically almost along the dead centre of the photograph but a closer look at the image reveals bomb damage in the form of large gaps in the terraced housing, freshly repaired roofs and even from the air, the look of general decay, as well as large areas which were soon to fall under the demolition ball for industrial use and later for the construction of the A012 Blackwall Tunnel Southern Approach.

The excellent Greenwich Heritage Centre has the LCC Bomb Damage Maps for the area and checking the 1946 photo against the relevant map, we can see that it is quite easy to match up the damage on the map with many of the scars on the photo.

The corresponding portion of the Bomb Damage Map (author's image from original held at Greenwich Heritage Centre)

The road running diagonally across the top left hand corner of the photograph is Tunnel Avenue and whilst this road is still largely extant, much of it has been swallowed and overshadowed by the A102. The houses at the top of the map are shaded in orange, which according to the colour coding system in use for them, indicates that the damage incurred was "General Blast Damage - Not Structural" and which would have been relatively easy to repair. Looking at the Civil Defence Incident Logs for the area, it is difficult to ascertain exactly when this damage occurred, given the frequency of the attacks on this part of Greenwich but given the fact that there is a large circle indicating a V-1 Flying Bomb hit, with the smaller circle of a V-2 nearby, it is possible that this was the blast from one, or both, of these weapons. The V-1 involved was the very first one to fall on the borough, indeed one of the first to fall on London - on 16th June 1944, whereas the V-2 concerned was the penultimate rocket to fall on Greenwich, on 9th March 1945, just two months before the end of the war in Europe. No casualties were reported for either incident, falling as they did on largely open ground.

The only other V-1 affecting the area shown in the photograph fell at the extreme bottom left hand corner of the image and was a far more serious affair. This occurred at 19:40 on 29th July 1944 and was reported as falling on the 'Towpath' near the 'Sea Witch' Public House in Morden Wharf Road. This resulted in two fatal casualties, 18 year old Ernest Tinton of Grenada Road, Charlton and Walter Saveall, 39 from nearby Azof Street. Interestingly, the Commonwealth War Graves Commission report Saveall as being a member of the Home Guard but it is unclear whether or not he was on duty at the time of his death. Nine others were sufficiently badly injured to be taken to St Alfege's Hospital. The area was, as could be expected, devastated by the blast and as well as the human casualties, the 'Sea Witch' pub, was lost forever. Local Historian Mary Mills wrote about the pub in her excellent Greenwich Peninsula History blog in 2013 and as she points out, had the pub survived, it would doubtless nowadays be enjoying a new lease of life given the prime location it once occupied.

The two roads running parallel to the Telcon Works are Mauritius Road and Azof Street. Nearly every property in these two roads seems to have been affected in some way. Most of the damage is marked in yellow, which means "Blast Damage - Minor in Nature", although there are some buildings shaded in light red indicating "Seriously Damaged - Repairable at Cost." The buildings do appear to be still standing in the 1946 photograph but it is difficult to see what sort of condition they are in, although in 2016, there are newer properties at this location on the map. In common with the entire locality, the area received the attention of the Luftwaffe on a regular basis during the Blitz, doubtless because of its proximity to the various industries strung out along the Thames. Most notably, the area attracted a large number of Incendiary Bombs during September and October 1940. Most of these were efficiently dealt with by ARP Wardens, the Auxiliary Fire Service and occasionally by members of the public defending their own homes but 14 Azof Street was reported as being damaged by fire on 11th September 1940, as was 63 Mauritius Road later in the Blitz, on 19th April 1941, when one of the occupants had to be treated at hospital. By this stage of the Blitz, the area seemed to be attracting High Explosive Bombs in the vicinity and whilst no direct hits are reported, number 80 Azof Street was seriously damaged on 1st November 1940 by such a bomb and the blast from similar weapons falling nearby was no doubt responsible for the lesser damage to the other properties in these two roads.

Enderby's Wharf in 2016 (Google Maps)

The road leading off to the right of Azof Street is Bellot Street, named after Joseph Bellot, the French Arctic explorer, who perished in mysterious circumstances in 1853 whilst searching for Sir John Franklin, who had disappeared on his own expedition in search of the Northwest Passage. This road, like the eponymous explorer, is shrouded in a certain amount of mystery. A close look at the 1946 photograph clearly shows some fairly catastrophic bomb damage, with 'prefabs' or some other type of temporary buildings appearing in the gaps left by the demolished houses. The Bomb Damage Map confirms this by showing several properties shaded in black, meaning "Total Destruction" and yet on the Incident Log, Bellot Street features only once, on 14th March 1944, with the explosion of an Anti-Aircraft Shell. Such an explosion could not possibly have caused the demolition of what looks on the map like 39 properties but nothing is mentioned. This level of damage could only realistically have been caused by either a Parachute Mine, or by a V-1 or V-2 weapon. The Incident Logs are usually a pretty good indicator of when and where bombs fell but just occasionally, being written up in the heat of the moment, things can go off the rails and this seems to be a case in point. One possible answer to the mystery lies on 9th September 1940 when an Unexploded Bomb is reported in Christchurch Way which is the road running parallel and beneath Bellot Street on the map. No further mention is made of this bomb, whether it was defused, or whether it subsequently exploded. This lack of further information might suggest that an error was made in the initial entry and that the UXB was in fact, in Bellot Street and that it did indeed explode. The only other possibility was the Parachute Mine that fell in the vicinity on 29th December 1940 and is reported as 'Dyson House, Ship & Billet P.H. and 28 Commerell Street.' This spreads the net pretty widely but seeing as the majority of the fatalities emanated from Dyson House (10 from this location), it does seem unlikely that the blast affected Bellot Street whilst leaving buildings in between still standing. We shall possibly never know the answer but the former of the two theories put forward seems the most plausible.
Christchurch Way is the road running at the bottom of Mauritius Road and Azof Street and shows some fairly serious damage on the map, with a long stretch in light red "Seriously Damaged - Repairable at Cost", with similar levels of damage in adjoining Derwent Street, along with some black "Total Destruction" and an area of green indicating a "Clearance Area." As before, the damage in September and October 1940 seems to have been caused more by Incendiaries, with one report on 18th September 1940 stating that "every street in the district" was affected. It must have been a nightmarish scene for those attempting to fight the numerous fires lit by these innocuous looking but deadly bombs. A High Explosive bomb on 1st November 1940 caused serious damage at the Azof Street end of Christchurch Way, whereas a further HE on 17th September seems to be the culprit for the damage at the junction with Derwent Street. 

The roads running at the top of the 1946 photograph also suffered their fair share of damage. The thoroughfare running across the top of the Telcon Works and intersecting Tunnel Avenue is Blackwall Lane and the first road running off this immediately after the green space at Tunnel Avenue is Lenthorpe Road. There is a large empty space both in the photograph and also marked in black on the Bomb Map. This building was destroyed in the early hours of 19th September 1940 by a High Explosive bomb, which not only demolished the building but which ruptured the gas and water main supplies for the area. There was one casualty resulting from this incident but fortunately not a fatality. The next turning along is Glenister Road and it was here, on the  afternoon of 17th October 1940, that a more serious incident occurred. Another High Explosive bomb caused the destruction of numbers 27-35 Glenister Road as well as seriously damaging several others. The destruction is duly marked in black on the map as well as a large swathe of purple, indicating that these properties were "Damaged Beyond Repair." More serious was the human cost, with two fatal casualties, both of whom were children; Ronald Rose, 12 years old of 31 Glenister Road and 4 year old Ronald Finch of 19 Glenister Road. A further 14 people were seriously injured and taken to St Alfege's Hospital. Closer inspection of the 1946 photograph reveals the bomb damaged sites to have been cleared and replaced by Nissen Huts or similar temporary housing.

This part of Greenwich, in common with the rest of London, was to face many years of rebuilding war damage, so-called 'Slum Clearance', demolition due to the 1960s mania for road building and coming into the present day, more development due to that scourge of modern London - "Luxury Apartments." The Google Maps image, when compared to the 1946 photograph and the Bomb Damage Maps, show the Greenwich Peninsula vastly changed, although not perhaps totally out of all recognition to a 1940s resident who was transplanted into the area in 2016. Whether he or she would prefer the modern version has to remain a matter for conjecture!

Unpublished Sources:

Metropolitan Borough of Greenwich Civil Defence Incident Logs 1939-45 - Greenwich Heritage Centre
LCC Bomb Damage Maps for Metropolitan Borough of Greenwich - Greenwich Heritage Centre
Internet Sources: