Friday, 24 May 2013

Footprints of the London Blitz (1)

Until very recently, I have had a large number of my wartime related photographs published on one of the well known photo sharing websites. A recent unilateral "improvement" of this site which I felt was anything but an improvement has finally given me the incentive to cancel my subscription, take the photos down and begin to re-publish them on this blog.

Rather than attempt to upload a hundred or more photographs in one hit, perhaps it is a good idea to use these images plus some which have never been published before to illustrate a theme relating to wartime London which still survives. This week, we are going to examine air raid shelter signs, a surprising number of which still survive in various parts of London. All of these images were taken by me, are my copyright and may not be used or reproduced without my express written permission.

Perhaps surprisingly, Westminster is the home to many surviving shelter signs, although less surprisingly these are mainly off the beaten track.

Lord North Street

The signs above and below are to be found at several locations along Lord North Street and Longmoore Street and indicate the way to shelters that were formerly located in 'vaults' in the basements of the properties concerned. These were public shelters which would have provided a measure of protection against anything but a direct hit on the premises above.
 
Longmoore Street
   
36 Longmoore Street

The next sequence of shelter signs are slightly easier to find, being on main roads but perhaps a thoroughfare which people would normally traverse by car or cab. The first sign is outside La Gavroche, a Two Star restaurant in Upper Brook Street, just off Park Lane. This isn't the only shelter sign to be found on this street, for continuing into Brook Street proper, two further signs can be found and these are also reproduced below.
 
43 Upper Brook Street


42 Brook Street


The final sign in Brook Street can be found outside number 72. All of these are remarkably well preserved.  

72 Brook Street

The final pair of shelters to be found in Westminster are in Queen Anne's Gate and are of a similar 'vault' type basement shelter. The first sign is now partially obscured by a Blue Plaque erected in 1954 by the erstwhile London County Council. Were the plaque to be erected today, the shelter sign would doubtless have been preserved but the fact that it has been partially obliterated reflects the mood of 1954; the Blitz was too recent a memory for most people and any remnants of it were not to be commemorated.

28 Queen Anne's Gate

A few doors further along though, we can still find an unadulterated sign, again in a good state of preservation. At the time of writing, it is partially obscured by a building contractor's hoarding but I am assured that when the works are complete, the sign will remain intact!

30 Queen Anne's Gate

Moving away from Westminster and the centre of the capital, we can find more shelter signs both in southeast and east London. In Poplar, we can find a sign outside Our Lady Immaculate Church in Norway Place, the crypt of which during the Blitz, in common with many other places of worship would have been used as a shelter. The faded sign tells us that the shelter was capable of accommodating 250 people, no doubt in fairly grim conditions but which would have provided respite from the horrors outside. This sign was painted over, no doubt immediately after the war but seventy years on, the black paint is wearing away, revealing once again the original sign.

Norway Place E13

Moving south of the river to the London Borough of Lewisham, we can find another cluster of signs. The first group can be discovered in and around Deptford High Street. The first one, adjacent to Deptford Station actually points towards a still extant location, the railway arches, although the shelters have naturally long disappeared. These are much larger signs than those found in Westminster and whilst some have been painted over, they are still readily visible and identifiable.

Deptford High Street SE8, adjacent to Station

There are a couple of other signs to be found just off the High Street, in Frankham Street and Comet Street and again, especially the former, still readily visible. These point to the location of now long demolished public surface shelters.

Frankham Street SE8

Comet Street SE8

For our next group of shelter signs, we remain in the borough but move along towards Lewisham itself. The first one we see is on the road bridge across the railway in Tanners Hill and once again, points towards a shelter that is now only a memory for some older residents of the area.

Tanners Hill SE8

The next sign is at the junction of Shardeloes Road and Lewisham Way and although the wall upon which it is painted is somewhat the worse for wear, the sign itself is still clearly visible some seventy four years after it was first painted.

Lewisham Way/Shardeloes Road junction

Until recently, there was another surviving sign in this area but which sadly has recently fallen victim to a new property development, being replaced by a facile imitation in the form of a Dollar sign advertising the development. This sign was in Jerningham Road and is shown below for the record.
 
Jerningham Road SE14

For our final shelter sign in this sequence, we remain in the Borough of Lewisham but move to nearby Ladywell Station, where a large sign advertising 'Shelter for 700' points to the direction of the nearby railway arches.

Ladywell Station SE13

For our final collection of shelter signs, we remain south of the Thames - just but move back towards the centre of London, to the old Metropolitan Borough of Bermondsey. The St John's, Neckinger and Lockyer Estates, all located within the borough close to Jamaica Road all have signs pointing to shelters located at the base of the various blocks. The shelters themselves are still extant but firmly sealed so as to prevent access. To show all of these shelter signs would be somewhat repetitive as they all look rather similar but reproduced below is the sign pointing towards Shelter A7 on the St John's Estate in Druid Street, SE1.

Shelter A7, Druid Street SE1

There are other shelter signs elsewhere in London that I am aware of but have yet to capture on film and no doubt there are others out there that I don't know about. Rest assured, they will appear here as and when they are photographed.

Unpublished Sources:

Author's private research


Friday, 17 May 2013

Logging the Blitz

The Blitz Hotel (Greenwich Heritage Centre)

Perhaps one of the lesser known aspects of the Civil Defence services during the Second World War but a vital one none the less was an administrative one, carried out as and when the bombs fell by a group of now anonymous senior air raid wardens or council officials, usually tucked away in the basement of a town hall at the end of a network of landline telephones and messengers. As each raid developed, every bomb that dropped, each incident as it developed, was logged and as the reports came in, the controllers would ensure that the correct response to each developing incident was despatched to the scene, whether this be the recognised emergency services such as the fire, police or ambulances, the seemingly mundane but equally essential  services such as the local gas board officials to switch off the supplies where gas mains had been severed by bombs, or the melancholy task of arranging mortuary vans to remove the unfortunate victims of war.

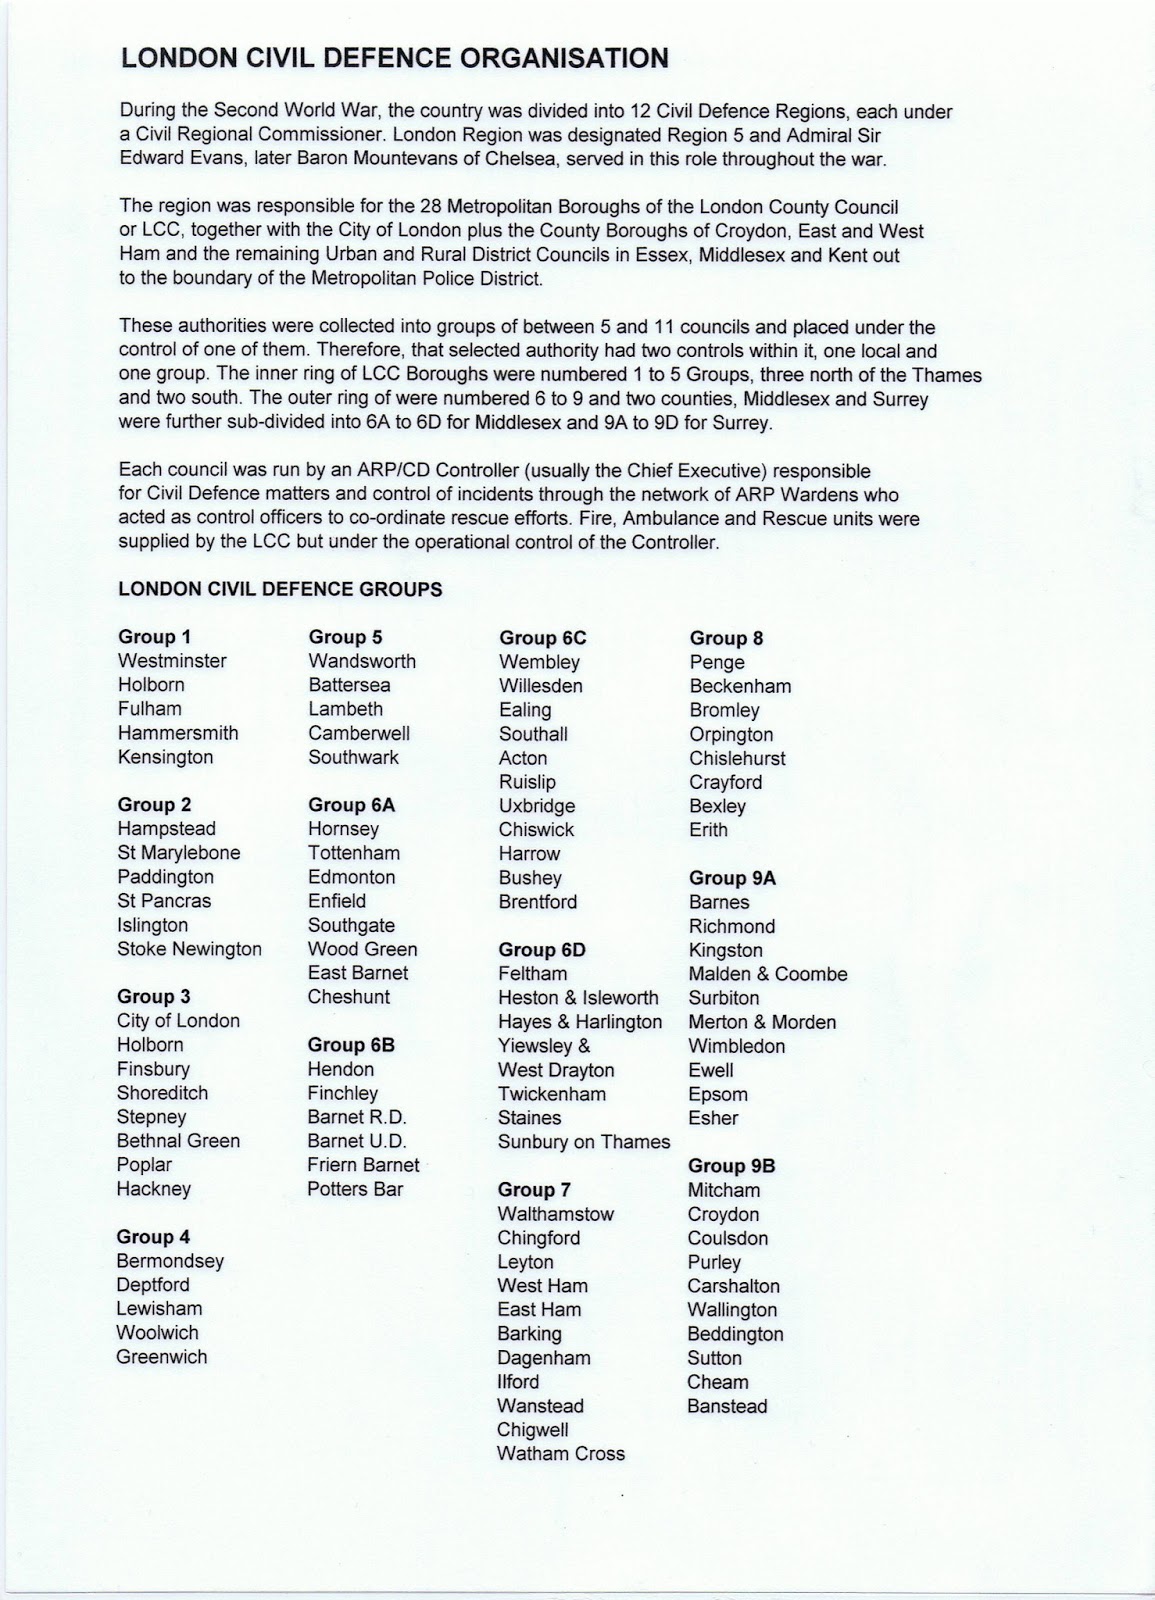
London Civil Defence organisation
The Civil Defence organisation had been established in 1938 as a response to the Munich Crisis and a brief explanation is required to give the reader a better understanding. The country was divided into twelve civil defence regions, each of which was placed under the control of a Civil Commissioner. London was designated Region 5 and was placed under the command of a veteran of Captain Scott's ill-fated Antarctic Expedition of 1912 and subsequently a First World War hero, Admiral Sir Edward Evans - "Evans of the Broke" as he had become known. Evans was to serve in his role as Civil Commissioner for the majority of the war and threw himself into the role with the energy and enthusiasm that had typified his Royal Naval service.

London Region was responsible for the 28 Metropolitan Boroughs of the erstwhile London County Council, or LCC as it was known, together with the City of London plus the County Boroughs of Croydon, East and West Ham and the remaining Urban and Rural District Councils in Essex, Middlesex, Kent and Surrey out to the boundary of the Metropolitan Police District. These authorities were collected into groups of between 5 and 11 councils and placed under the overall control of one of them. Therefore, that selected borough had two controls within it, one local and one group. The inner ring of LCC Boroughs were numbered Groups 1 to 5, three north of the Thames and two south. The outer ring were numbered 6 to 9 and two counties, Middlesex and Surrey, were further sub-divided into 6A to 6D for Middlesex and 9A to 9D for Surrey.

A typical 'chain of command' - this one is for Westminster

Each council was run by a Civil Defence Controller (usually the Town Clerk/Chief Executive) who was responsible for Civil Defence matters and the control of incidents through the network of ARP Wardens who acted essentially as incident officers, patrolling the streets often during the height of an air raid, pinpointing incidents and co-ordinating rescue efforts on the spot. Fire, ambulance and rescue services were supplied by the LCC but were under the operational control of the Controller. A copy of the organisation for London Region is shown for easy reference, as is a copy of a typical 'Chain of Command' for one London borough - on this occasion Westminster but which was echoed across the capital.

A typical incident report sheet (author's image)
Fortunately for today's historian, the majority of London boroughs kept their Incident Logs after the war, although some did dispose of them in the 1960s and 70s, in what today seems like a terrible piece of historical vandalism. Neil and I have spent many hours sitting in local authority archives transcribing these records and although we still have a few to go, between us we have so far gathered about half of the various London boroughs' records.

Reading these logs today, it is amazing to think that they were written at the moment that history was being made. The actual presentation of the logs varies from borough to borough; for example the Greenwich Log has been transcribed at the time into a series of A4 sized notebooks, whilst the neighbouring borough of Woolwich's log is still as it was written at the time with each individual development of an incident written on a separate report sheet. In this way, a major incident could require upwards of twenty such sheets, each updating the incident as it developed.

The other striking thing about reading these logs today is the matter of fact way that major incidents were noted. Whilst this professionalism cannot be faulted, one cannot help but wonder what feelings were going through the minds of the officials concerned whilst writing up and recording these reports, especially on those occasions when they were reporting on incidents in their own immediate neighbourhoods, or perhaps even seeing a report of their own homes being destroyed. Reproduced above is a typical report sheet from the Borough of Woolwich, which reports a fairly minor incident but which gives the reader the general idea of how an incident was written up.

Sometimes, these reports can today appear ridiculously terse; for example the terrible incident on 17th April 1941 that saw the destruction of Chelsea Old Church and the tragic loss of life of Canadian firewatcher Yvonne Green and four of her colleagues is reported simply "Para Mine - heavy damage, casualties, water and gas mains gone." Obviously, there would have been more detailed incident sheets written at the time but this precis still somehow captures the horror of the incident, which was recorded more fully in the April edition of this blog. In other boroughs, the reports go into more detail, some of which even seventy years on, are heartbreaking. For example, the Woolwich report of an incident in the 'Little Blitz' on 2nd March 1944, lists the four fatal casualties by name, including six week old baby Joyce Bowskill - a life cruelly ended before it had properly begun and which had even this fairly hardened researcher having to stop work for a while in order to reflect.

Devastation in Heavitree Road (Greenwich Heritage Centre)
The onset of the terror weapons in 1944 kept the recorders busy and in the south east London boroughs especially, the casualties started to mount again. A Woolwich report of an incident at Heavitree Road, Plumstead on 16th June 1944 lists seven fatal casualties and laconically describes "houses in Heavitree Road heavily damaged." A local photographer recorded the scene and it must be said that the writer of the report was a master of understatement.

Throughout all of the horrors of the London Blitz, a sense of humour prevailed, even amongst the Wardens and Civil Defence personnel who were very much in the front line and saw some terrible things in the course of their duties. When the Wardens' Post 'EE1' in Milward Street, Woolwich was rendered uninhabitable following a nearby V-1 strike in August 1944, the wardens, who must have endured a fearful shaking up when the flying bomb detonated, still saw fit to re-christen their devastated place of work 'The Blitz Hotel' as the accompanying photograph at the head of the page shows.

In August 1944, the British public may have been forgiven for thinking that despite the onset of the V-1s, the end of the war was in sight. Unfortunately, they had another seven months of V-2 rockets to endure, which brought yet more misery to the people of London but which were faithfully recorded by the London boroughs. The final incident shown in the Woolwich Incident Log is on 19th March 1945 was a rocket which fell on one of the piers servicing the Woolwich Arsenal, which itself had suffered terrible damage during the Blitz of 1940. This rocket exploded on the pier itself, causing 37 'slight' casualties, no doubt mainly cuts and shock but mercifully no fatalities. The last V-2 of all fell on Kynaston Road, Orpington on 27th March 1945, killing Mrs Ivy Millichamp in her home. With this one final fatal casualty, London at last had seen it's last attack from the German bombs which had started way back in August 1940.

Unpublished Sources:

Civil Defence Incident Logs for Metropolitan Boroughs of Chelsea, Greenwich & Woolwich and City of Westminster 


Sunday, 5 May 2013

Apres Moi Le Deluge: 617 Squadron, Cheshire, Tait and Fauquier

617 Squadron Badge (RAF)
This month marks the seventieth anniversary of Operation Chastise, more commonly known as the Dambusters raid. We covered this raid in the May 2012 edition of this blog, in which we looked at the story of Barnes Wallis, who invented the bouncing bombs used on the raid, at Wing Commander Guy Gibson VC who commanded 617 Squadron, the special squadron established for the raid. Having already covered this raid, perhaps now is a good time to commemorate the other wartime exploits of this elite squadron following on from the Dambusters raid.

617 Squadron was formed amid great secrecy on the orders of Sir Arthur Harris, head of RAF Bomber Command, on 21st March 1943 for the express purpose of undertaking the raid on the Eder, Mohne and Sorpe Dams and therefore delivering the bouncing bombs, codenamed Upkeep that had been designed for that specific purpose. Although the squadron had originally only been formed to carry out this one mission, once the raid had been completed, it was decided to keep 617 in being as an elite unit to be used in carrying out precision attacks on specialised targets. 

Guy Gibson relinquished command of the squadron he had established in July 1943 and handed over to his successor, Wing Commander George Holden. After some well deserved leave, Gibson was sent on a lecture tour of the USA and Canada which lasted nearly five months. Gibson was eventually to return to operational flying in September 1944, only to be killed almost immediately whilst returning from a raid on Rheydt and Moenchengladbach on the 19th September. 

George Holden's tenure at 617 Squadron was to be tragically brief as he was shot down and killed on his fourth mission, which was an attack on the Dortmund-Ems Canal in September 1943 and died along with four members of Gibson's original crew. A veteran of the Dams raid, Harold 'Mickey' Martin took command of the squadron on a temporary basis, before handing over to another legend of Bomber Command, Group Captain Leonard Cheshire, the youngest person to hold this rank in the RAF. Cheshire had already completed three operational tours and was an inspirational figure to his crews. When appointed as commander of 76 Squadron, Cheshire had inherited a dispirited unit, beset by problems with the then new Halifax bombers which were suffering high losses due to their poor performance and inability to reach the same altitudes as the Avro Lancaster. Cheshire had immediately set about removing the nose and mid-upper turrets on his squadron's aircraft as well as other unnecessary weight and with this improved performance, the altitudes improved, the loss rates dramatically dropped and the morale amongst the squadron improved accordingly. He also made representations to Handley Page, the builder of the Halifax to make modifications to the tail of the bomber so as to improve the aircraft's stability. 

Gp Capt Leonard Cheshire (IWM)
Cheshire was also determined to improve the accuracy of 617's bombing and pioneered new methods of marking targets at very low levels, firstly using a Mosquito and latterly a single engined P51 Mustang fighter, the gift of the US Eighth Air Force, which Cheshire insisted on flying himself. Under Cheshire's command, 617 attacked the V-3 installations at Mimoyecques in the Pas de Calais area of France. The V-3 was the third of Hitler's vengeance weapons, a supergun designed to fire a 500lb shell into London every minute. Using the Barnes Wallis designed Tallboy bombs, 617's bombing was devastatingly accurate; the massive bombs penetrated the ground alongside the concrete protecting the site, effectively putting it out of commission for the duration of the war. The V-3 was never used against London. 617 Squadron continued to use the Tallboys with devastating effect and on 8th June 1944, attacked the Saumur railway tunnel, which was a supply line for the Germans to bring reinforcements to the Normandy front. Accurate marking by Cheshire ensured that the railway cutting and the tunnel roof were both breached, with the line remaining blocked until Allied forces took the area some weeks later. On 14th June, the Tallboys were once again deployed, this time to destroy E-Boat pens at Le Havre. The E-Boats posed a serious threat to the ships supplying the Normandy beachhead. Once again, accurate marking by Cheshire at low level and in broad daylight ensured that 617 found their target with several bombs, utterly destroying it.

At the end of his fourth tour of duty and after 102 missions, Cheshire was awarded the Victoria Cross, not for a specific act of bravery but rather for a sustained period of valour, repeatedly putting himself at risk marking targets in his Mosquito or Mustang often at low level and under intense anti aircraft fire. Following the award of his VC, Cheshire was relieved as commander of 617 Squadron by Willie Tait and for his 103rd and final mission, Cheshire acted as the official British observer of the second atomic bomb, dropped on Nagasaki. After the war, Cheshire embarked on a remarkable change of career, eventually founding the  Cheshire Foundation Homes providing support for disabled people throughout the World.

Tirpitz capsized (Australian War Memorial)
Cheshire's successor at 617 Squadron was Group Captain James 'Willie' Tait, who took over in July 1944 and continued his predecessor's policy of precision attacks using low level marking. A succession of attacks on V-1 and V-2 sites followed, again using the Tallboy bombs and thus sparing London from at least some of these vengeance weapons. Tait, already highly decorated for his previous exploits with Bomber Command was awarded a bar to his DFC for pressing home a low level attack on the Kembs Dam in Southern Germany. On 15th September 1944, the squadron attacked the German battleship Tirpitz, which was anchored in Kaa Fjord in northern Norway. The squadron attacked from a base near Arkhangelsk in Russia and despite the Germans attempting to disguise the vessel using smoke flares, the squadron disabled the battleship so severely that the Kriegsmarine decided that it could not be made seaworthy again but decided to move the vessel to Tromso, where it's guns could be used in defence of an anticipated Allied invasion of Norway. The damage to the battleship was successfully kept secret by the Germans and so on 28th October a second raid was mounted by 617 Squadron, this time flying from Lossiemouth in Scotland. This raid was not a success due to low cloud obscuring the target but not to be deterred, the squadron returned on 12th November and this time three Tallboys struck and capsized the Tirpitz. Although a small number of her crew were rescued, between 950 and 1,200 were trapped inside the hull and perished.

By December 1944, Tait had completed 101 missions and was stood down from operational flying. He remained in the RAF post war, eventually retiring in 1964. His successor as commander of 617 Squadron was the Canadian, John Fauquier, under whose command the squadron continued to attack precision targets using the Tallboys and latterly the 22,000 lb Grand Slam bomb, another Barnes Wallis invention, which was used to attack and destroy the Bielefeld and Arnsberg Viaducts as well as other railway targets in northern Germany. Also attacked were the submarine shelters at Valentin in France and also in Hamburg, rendering them unusable. Their final target, on 19th April 1945 were the coastal gun batteries at Heligoland. By this time, the war in Europe was approaching it's end and no further worthwhile targets could be found for these massive bombs. After the war, Fauquier returned to his private business in Canada and passed away in 1981.

The years of peace saw 617 Squadron re-equipping with Avro Lincolns, then entering the jet age with the English Electric Canberra and forming part of the V-Bomber force with Avro Vulcans before most recently re-equipping with the Panavia Tornado and has seen action in both Gulf Wars of 1991 and 2003.


Published Sources:

Bomber Command 1939-45 - Richard Overy, Harper Collins 1997
Dambusters: A Landmark Oral History - Max Arthur, Virgin Books 2008
VCs of the Second World War - John Frayn Turner, Pen & Sword 2004


Friday, 19 April 2013

St Alfege's, Greenwich and The Fuhrer's Birthday Present

St Alfege's Church in 2013 (author's photo)

April 19th is St Alfege's Day and to paraphrase Michael Caine it is probably true to say that "not a lot of people know that." The following day is perhaps better known, at least to Second World War historians as being the birthday of Adolf Hitler and whilst one would not normally mention two such opposite men in the same breath, let alone the same piece of writing, perhaps on this occasion an exception can be allowed as there is a connection between the two, albeit a slightly tenuous one.

Bishop Alfege was born in the year 954 in Weston, on the outskirts of Bath into a wealthy family. Despite his family's priveliged position in Anglo-Saxon society, he eschewed their wealth in order to enter a monastery. After becoming Abbot of Bath, he became Bishop of Winchester in 984 and in 1006, Archbishop of Canterbury. Alfege was a great church reformer and it was said of his time at Winchester that "There were no beggars in Winchester whilst Alfege was bishop."

During Alfege's time, Danish Vikings were regularly raiding the English coast and in the year 1011, they moved inland to sack Canterbury, pillaging the cathedral and massacring the local populace. In an attempt to restore peace and save innocent lives, Alfege offered himself as hostage and was taken in chains to Greenwich. On April 19th 1012, the Danes demanded 3,000 gold marks be paid in order to release the Archbishop but Alfege immediately let it be known that he would refuse to allow anyone to ransom him. As a result, the enraged Danes bludgeoned him to death with meat bones and stones and threw his body into the Thames. Alfege was the first Archbishop of Canterbury to die a violent death and following this outrage, the oar of a boat near to his body on the Thames foreshore reputedly blossomed into leaves and flowers. As a result of this miracle, the Danes allowed his body to be transferred to St Paul's Cathedral, where it remained for some eleven years before being moved to it's final resting place at Canterbury. Alfege was canonised in 1078 by Archbishop Lanfranc.

The site of Alfege's murder became a shrine and whilst it is not known exactly when the first church appeared on the site, it is fairy certain that a church of sorts was established fairly soon after his death. The present church is thought to be the third built on the site and was erected between 1712-1714 and is the work of the celebrated architect Nicholas Hawksmoor. There was a delay in consecration due to the parishioners' objections to the requirement of a 'seat of distinction' for the Royal Family. This opposition was eventually overcome and the church was duly consecrated in 1718. There are several famous people buried in and around the church, arguably the most famous being General James Wolfe, a Greenwich resident and victor of the Battle of Quebec in 1759, who died in that same battle and was returned home to Greenwich aboard HMS Royal William to be interred in the crypt of the church.

We now move forward nearly 200 years to the Greenwich of the Second World War during early 1941. The Blitz had been raging on London since the previous September and Greenwich, along with the rest of the capital city had been pounded mercilessly. Whilst the industry then prevalent along the river and in East Greenwich had undoubtedly been the main target, the historic buildings of Greenwich Town Centre had not been spared either. This 'collateral damage' to coin a modern phrase had included the Royal Naval College, damaged on 8th September 1940, which elicited a visit from no less a personage than Winston Churchill himself. Three months later came the turn of the Royal Observatory in Greenwich Park, grievously wounded in December 1940 and in between these incidents, even General Wolfe's statue had been pockmarked by shrapnel, the wounds showing to this day. Despite all of this, St Alfege's remained unscathed, looking watchfully over Greenwich.

By March 1941, apart from two minor incidents on the 9th and the 15th, the first eighteen days of the month passed without a major raid on London and some Londoners were beginning to become cautiously optimistic. The raids were no longer coming nightly as in the dark days of the autumn and winter of 1940-41 and perhaps the worst really was over. Unknown to Londoners, Hitler was turning his eyes eastwards towards Russia, then allied to Germany but whose vast expanses of land were already being looked at with envious eyes for the lebensraum he so coveted for the German people.

Before invading the Soviet Union though, a final series of raids was planned to perhaps finally smash Britain out of the war and leave the Nazis masters of Europe. Hitler's birthday was also approaching and there were some in the Nazi Party, such as Luftwaffe Chief and Reichsmarshall Hermann Goering, who ever the sycophant, saw these raids as a way of currying favour with the Fuhrer and celebrating his birthday with a major air raid. This new series of attacks, although not on a nightly basis were to culminate in the heaviest raids unleashed on the capital.

The ruins (Greenwich Heritage Centre)
The sirens sounded over London a little before 9pm on 19th March and it was not long before the high explosive and incendiary bombs were raining down upon London. As before, Greenwich was taking it's share of the punishment. The incendiaries, especially seemed to pour down on Greenwich and the old Town Centre around Trafalgar Road was soon in danger of being inundated. An hour into the raid, the incendiaries reached St Alfege's and a number of them penetrated the roof. The hard pressed Fire Brigade were unable to help and in an alarmingly short time, a blazing mass of timbers and molten lead from the roof collapsed down into the nave of the old church. At first sight, the destruction of the church seemed total but fortunately, the walls and clock tower remained intact. Despite this ray of hope for a future rebuilding, for the time being at least, St Alfege's Church was ruined. By a strange quirk of history, the destruction of the church had taken place one month to the day short of the 929th anniversary of Bishop Alfege's murder at the hands of an earlier pack of barbarians.

Following this great raid of 19th March, the remainder of the month saw no Luftwaffe activity over London. The next major attack came on the night of the 16th/17th April and such was the intensity of this raid that Londoners remembered it in years to come simply as 'The Wednesday'. This was the day when, elsewhere in London that crooner Al Bowlly was killed in his Piccadilly apartment and also when Chelsea Old Church joined the list of historic London places of worship to succumb to the Luftwaffe. Another short lull followed until the day of Hitler's birthday itself - the 19th/20th April. Another intense raid followed and once again Greenwich suffered grievously, as did the remainder of London. This raid also passed into folklore as 'The Saturday' and saw death and destruction raining down upon Greenwich once again.

The remainder of April 1941 passed without further incident but one further raid was to strike a terrible blow at London; the night of 10th/11th May, covered in this blog in July 2010, was to prove the heaviest raid ever mounted on the capital, when almost 2,200 fires were started and some 700 tons of bombs were dropped, leaving over 1,400 Londoners dead and another 1,800 seriously injured. From the guarded optimism of two months previously, the citizens of London began to fear for the worst and what the consequences of another raid like May 10th/11th might be.

Devastated Greenwich in 1945 (Greenwich Heritage Centre)
And yet the bombers failed to return. Hitler's will was to prevail as it always did and the attack would turn east. For the assault on the Soviet Union, the Luftwaffe would naturally be required to support the Army and as a result, units were transferred east despite the entreaties of senior Luftwaffe figures such as Milch, Kesselring and Sperrle to continue with the attacks on British cities. This would certainly have been possible as one complete Luftflotte - no. 3 under Hugo Sperrle was to remain in France in considerable strength and would have been quite capable of continuing the Blitz. Fortunately, it was not to be and the strength of the Luftwaffe was to be gradually depleted on the Eastern Front, in Italy and repelling British and from mid 1942, American air raids upon Germany and occupied Europe. An ill advised attempt to revive the air raids upon London in January 1944 only depleted the Luftwaffe's strength even more and the 'Baby Blitz' as it was somewhat contemptuously named by the British, petered out by May 1944 by which time the Luftwaffe was a shadow of it's former self and ill-equipped to counter the Allied invasion of Normandy in June 1944.

The coming of peace in May 1945 saw St Alfege's Church still in a ruined condition but plans were quickly put in hand for it's rebuilding. Work began in 1946 under the direction of architect Sir Albert Richardson, who was determined to preserve as much of Hawksmoor's work as possible. Each surviving fragment of cornice work, plaster mouldings and carvings were collected from the ruins and full scale drawings made of all of them. Some original materials were also reinstated and the painstaking work of combining the old with the new and restored was not to be completed until 1953, when the church was finally rededicated on St Alfege's Day.

Honourable Scars (author's photo)
Today, the famous old church remains watching over Greenwich and is well worth a visit, whether for a service, one of the classical concerts that are often staged there, or purely for sightseeing. The church contains a number of fascinating military memorials from both World Wars, perhaps most notably that of the London Territorial Field Ambulance from 1914-18 as well as several other standards and pennants 'laid up' in the church. General Wolfe's tomb, safe in the crypt, survived the bombing and remains in situ, resting in his home town. Outside, the building retains some honourable scars from the Blitz to rightly remind us of the troubled past of this centre of Britain's maritime history.

Published Sources:

A Wander Through Wartime London - Clive Harris & Neil Bright, Pen & Sword 2010
The City That Wouldn't Die - Richard Collier, Collins 1959
The Parish Church of St Alfege (handbook and guide) - Privately Published

Unpublished Sources:

Metropolitan Borough of Greenwich - Civil Defence Incident Log 1939-45


Friday, 12 April 2013

The End of Hitler and other odd Wartime memorabilia

A match for Hitler! (author's photo)
In a previous edition of this blog, we looked at the cult wartime BBC radio show, ITMA and touched on how despite everything, the British sense of humour generally prevailed during the wartime years. It was not only ITMA and other radio shows that helped keep people smiling and a recent search through through some of my photo archive (looking for something else, of course) brought to light some of the more bizarre, if not downright tacky pieces of wartime memorabilia, which somehow typified the defiant British attitude towards the Nazis during the wartime years. 

The first item that came to light was at first sight a fairly unremarkable book of matches, which on one side shows the simple slogan "A match for Hitler!" When the book is reversed, we see staring out at us a likeness (not a very good one, it has to be said) of Winston Churchill, complete with trademark cigar. Not exactly side splitting humour but perhaps a surprising piece of trivia and one which may have caused the odd smile on the way to work, or in the pub.
Churchill! (author's photo)

The next item that came to light can only be described as a simple novelty item along the lines of "What the butler saw" which has a "pull-out" section. Simply described as "The End of Hitler" the item is shown in it's final pulled out format and probably needs no further description!

It is unclear if this item was sold as a novelty or some sort of 'give away' item and if it were sold, then it is unclear just who would buy something like this. The humour can only be described as basic but leaves one in no doubt as to the true feelings towards The Fuhrer.

The End of Hitler! (author's photo)

Another piece on similar lines was what appears to be a simple two sided card which again featured Adolf Hitler but this time with his likeness superimposed on the rear end of a pig. Unkind to the pig perhaps but the humour of the captions "A CHARACTER STUDY" and "Why HITLER is not at the Front" although more than a little strained, makes clear the feeling at the time. Once again, it is unclear whether this card was sold as a novelty item, or whether it was part of some kind of give away perhaps in a newspaper.

A Character Study (author's collection)


If the humour on the front of this card appears strained, then that on the rear is bordering on the puerile. It consists of a list of Hitler and his henchmen, with the names of Hitler, Goering, Goebbels and Ribbentrop presented as acronyms, with a fresh insult against each letter of their names. The final part of the 'joke' is explained on this side of the card as to why Hitler is not at the Front. The answer is that he was at the Rear!

Hitler and his gang (author's photo)

The final piece of humour on display here is a Christmas novelty item of the 'pull out' variety and is illustrated below in both formats. What starts off as an innocent enough looking little ditty 'To Adolf, from Tommy' pulls out to reveal a quite risque (for it's time) image of a First World War style 'Tommy' with the message 'Kiss My Aunt' pinned to his backside!

To Adolf (author's photo)


From Tommy (author's photo)

Perhaps these novelties were aimed at the lowest common denominator in British humour but even with the benefit of some seventy years distance from when they were issued, it is unclear how much appeal they would have had and who exactly they were aimed at. This writer has never seen these or anything like them anywhere else and we are to be grateful to the excellent Greenwich Heritage Centre who have preserved these items in their archives.

Propaganda takes many forms and despite the crudity and poor standard of much of this humour, it has to be said that this innocent 'end of the pier' version of anti-Nazi propaganda is much more preferable to the more sinister variety practiced by Dr. Goebbels and his Ministry.

Unpublished Sources:

Material from Greenwich Heritage Centre

Saturday, 23 March 2013

The Battle of The Atlantic: A survivor in London

HQS Wellington today (author's photo)

Last weekend saw the seventy fifth anniversary of the launch of a ship that in more recent years has become something of a London landmark, or rivermark to be more accurate. That ship is the cruiser HMS Belfast which has been a familiar sight in the Upper Pool of London for some 42 years now since her opening as a museum ship in October 1971; in fact she has now been a museum ship for a longer period than she saw active Royal Navy service. We shall look at her career in a future edition of this blog as HMS Belfast has another significant anniversary coming up later in the year.

There is another former Second World War Royal Navy vessel moored a short distance upstream from the Pool of London that is passed by thousands of people every day, without more than a fraction of them realising that the smart little white ship that they see today, is in fact a veteran of the Battle of The Atlantic.

That ship is HQS Wellington, a Grimsby class sloop and the only survivor, at least in UK waters, of the Battle of The Atlantic. Originally one of a class of eight ships for Royal Navy service, HMS Wellington as she was christened, was built by HM Dockyard, Devonport and completed on 24th January 1935. As built, she was armed with two 4.7 inch guns, one 3 inch anti-aircraft and was capable of 16.5 knots. The raison d'etre of these sloops was primarily as patrol and escort vessels, with some vessels being capable of minesweeping duties. In keeping with other Royal Navy sloops of the time, the Grimsby class were all named after British coastal towns and seaports. However, an exception was made for Wellington, the final ship of the class. Destined for service on the New Zealand Station, she was named after the capital city of that country and following her commissioning and working up exercises, she sailed for New Zealand and arrived at her namesake city on 13th May 1935.

HMS Wellington in 1943 (Convoyweb)

The remaining years of peacetime service saw Wellington settling into a routine of patrols around the New Zealand coast and the South Pacific, with occasional visits to Sydney for her annual docking and refit. On the outbreak of war on 3rd September 1939, she sailed from Auckland for her wartime station of Singapore, where she arrived on the 19th of that month. She was then based at Penang until 2nd November, when she sailed for the United Kingdom. En route home, Wellington was diverted to Freetown where she collected convoy SL13 bound for Liverpool. Following safe delivery of the convoy on 6th January 1940, Wellington sailed to Cardiff, where she arrived on 9th January.

On completion of this refit, Wellington joined Western Approaches Command based at Devonport and later at Liverpool, from where she escorted many Atlantic and Gibraltar convoys. In May and June 1940, her escort duties were interrupted whilst she was involved in the evacuation of British troops from Le Havre and St Valery. She then resumed her Atlantic and Gibraltar escort duties until the middle of 1941, when she joined the long distance escorts on the Freetown route. She remained on this route until November 1942, when she became involved in the escorting of the fast troop convoys to and from North Africa following Operation Torch, the Allied invasion of North Africa, after which she returned to Freetown to escort convoys from there to ports on the Nigerian coast. During this period, one of her commanding officers was John Treasure-Jones, who would become famous as the final captain of the Cunard liner Queen Mary, but then serving as a Lieutenant Commander in the Royal Naval Reserve.

Lt.Cdr John Treasure-Jones in 1943
What must have been a welcome respite for the men of HMS Wellington came in May 1944, when she was sent to Bermuda for a two month refit, after which the ship was sent to the Clyde for further work. On completion of the refit, Wellington returned to Freetown in September 1944 and transferred to Gibraltar in January 1945 to serve out the remainder of the war. A satisfying moment for HMS Wellington came right at the end of the war, when the German U-Boat U-541 surrendered to the elderly sloop. Her war over, HMS Wellington returned to the UK in June 1946 and following de-storing, paid off into reserve at Milford Haven on 6th August 1945.

Normally, this would have been the end of the line for Wellington and it could reasonably have been expected that she would join the long line of tired fighting ships heading for the scrapyard but after nearly two years of languishing in reserve, this proud vessel earned an unexpected reprieve when she was purchased by the Honourable Company of Master Mariners to serve as their floating Livery Hall in King's Reach on the River Thames. During a major refit at Chatham Dockyard, her engines and boilers were removed and the large space vacated became the Livery Hall with fine wood panelling and a sweeping staircase, all salvaged from passenger vessels being scrapped. Re-christened HQS Wellington (for Headquarters Ship) this remarkable survivor arrived at her new berth in December 1948 and apart from a drydocking at Sheerness in 1991, has been a permanent feature of the London scene ever since.

On July 1st 2005, the ship's ownership was transferred to The Wellington Trust, a charitable body established to ensure the continued survival of this historic vessel.

As a working ship, HQS Wellington is not normally open to the public but is available to hire for weddings, conferences and parties and is usually a participant in the London Open House Weekend, which this year is taking place over the weekend of 21st/22nd September 2013. An excellent chance to visit the ship outside of this weekend is a special exhibition being held this year to mark the seventieth anniversary of the climax of the Battle of The Atlantic. This free exhibition, entitled 'CONVOY: The Battle of The Atlantic' runs from 12th May to 16th December 2013 and is open from 11:00 to 17:00 on Sundays and Mondays only during this time.

Next time you are walking or driving along Victoria Embankment past this trim white ship, remember the part played in keeping open our sea lanes not only by the Wellington but by all of the ships and men of the Allied navies and merchant fleets.


Published Sources:

BEF Ships before, at and after Dunkirk - John de S Winser, World Ship Society 1999
Sloops - Arnold Hague, World Ship Society 1993
Warships of World War II - HT Lenton and JJ Colledge, Ian Allan 1973

Web Resources:

Arnold Hague Convoy Database
The Wellington Trust Official Website

Saturday, 9 March 2013

More from The Hamburg Bunker

The Heiligengeistfeld Flakturm (All images author's photos)
Following the last edition of the blog which covered the Hamburg Air Raid Shelter Museum, this week's edition is mainly a pictorial effort in order to share some more photographs taken during my recent visit to the Hanseatic port on the River Elbe.

The first picture shows one of the remaining Flakturm or Flak Towers, of which numerous examples survive across Germany, mainly by dint of the their sound concrete construction. This particular tower is a Flakturm IV, dating from 1942 and can be found on the Heiligengeistfeld, adjacent to St Pauli FC's Millerntor Stadion. The concrete walls are 3.5 metres thick and were designed to be able to withstand anything that the RAF and USAAF had in their arsenal at the time. The RAF's 22,000 lb Grand Slam bomb, introduced in 1944, could undoubtedly have penetrated the bunkers but these bombs were never used in area bombing and instead were used on precision military targets such as railway viaducts and U-Boats pens; indeed Hamburg was the target for some of these massive bombs, when right at the end of the war, on 9th April 1945, they were used to successfully destroy the U-Boat Pens at the Blohm & Voss Shipyard.

The Light gun platform on the Flakturm
Going back to the Flakturm, they were designed to carry four heavy anti aircraft guns - usually 88mm or 128mm pieces on each corner, with smaller guns, usually 37mm or 20mm - on the surrounding gallery. Inside, each tower was designed as an air raid shelter, with space for upto 10,000 civilians in reasonable comfort, also including a hospital. During the Operation Gomorrah raids on Hamburg in the summer of 1943, space in these towers would have been much sought after. The similar towers in Berlin became extremely overcrowded during the final days of Nazi rule over that city in April and May 1945, when some 30,000 civilians crowded into each shelter as the Red Army encroached upon the city. Needless to say, with those number crammed into the towers, conditions rapidly deteriorated and soon the towers soon became scenes of unimaginable squalor.

Today, the Hamburg Flakturm sees a much more peaceful usage, being used as a nightclub, music school and a music store, as well as benignly overlooking the Hamburger Dom funfair three times a year as well as numerous exhibitions and circuses and the fortnightly football crowds visiting St Pauli FC's Millerntor Stadion. There is also a second Flakturm in Hamburg, on the southern side of the River Elbe, in the Wilhelmsburg district which I have yet to visit but will hopefully do so on my next trip to the city. Due to their immensely strong construction, these towers have often proved difficult to demolish; indeed, one local informed me that if explosives were used to destroy the Heiligengeistfeld tower, half of neighbouring St Pauli would be taken out with it!

The Baumwall Shelter
Nazi Eagle over entrance
The other bunker that I photographed in Hamburg was an example of a Rundturm or Round Tower, of which there are several surviving examples, usually located adjacent to a convenient S-Bahn station. The example shown here is located at Baumwall, close to the Landungsbrucken Station as well as the Baumwall U-Bahn Station. These shelters were somewhat more aesthetically pleasing to the eye, being brick clad and having a conical shape roof. This roof, despite it's pleasing shape, actually had a practical use, being reinforced to allow incendiary bombs to bounce off harmlessly onto the ground. Inside, these shelters were of smaller capacity than the Flakturm, being normally able to accommodate 600, although during the 1943 raids, no doubt a much larger number managed to squeeze inside. These towers were completed very quickly during the early months of 1940, but despite the rapidity of their construction, they proved very sturdy and in Hamburg alone, some twelve of these Rundturn survive to this day, their modern day usage varying from a Portuguese restaurant in the Baumwall shelter, to that of a bar and also for industrial storage. One detail that has survived almost intact on all of these shelters, is the large Nazi Eagle over the entrance. Almost intact except for one detail; the Swastika has been chiselled off or cemented over in every instance.

So, to return to the Air Raid Shelter Museum in Hamm. In the previous edition of this blog, we described the Museum in some detail as well as some background information concerning the Operation Gomorrah raids of July and August 1943 but space precluded the inclusion of all of my photographs, so in answer to various requests to see some more, here goes.

An Air-Raid Siren on display in the museum
Luftschutz helmets
Some of our group examining the artefacts on display
Warped bottle and head of British 4lb incendiary bomb
The first shot shows an air raid siren on display - obviously, in wartime, these were located all across the city in various locations, usually on top of public buildings where the sound could be easily projected across the city. The second shot shows steel helmets used by the Luftschutz - the German equivalent of the ARP or Civil Defence Wardens. Like their British equivalents, these wardens were largely volunteers and could be male or female. The next shot shows some of the members of our group examining some of the various artefacts on display within one of the shelter tunnels, whilst finally in this series of four images, we see another of the bottles discovered outside warped into an odd shape by the incredible temperatures generated in the firestorm of 27th July 1943, whilst alongside it we see the remnants of one of the approximately 350,000 British 4lb incendiary bombs dropped on Hamburg and which were largely responsible for the conflagration.

'Public Air Raid Shelter This Way'

Child's Gas Mask

No Smoking!
The next series of three photographs show a sign that would have been prominent across all towns and cities across Germany and basically is a direction sign that say 'For Public Air Raid Shelter' with a large arrow pointing in the direction of safety. Next we see an example of a child's gas mask. In the Second World War, both sides feared a repetition of the horror of the First World War's use of poison gas and equipped their civilian populations and armed forces with gas masks. Indeed both Allied and Axis powers did have stockpiles of Mustard Gas as well as other gasses but mercifully, neither side ever used them. Finally, in this series, we see a 'No Smoking' sign still extant on one of the tunnel walls.

Luftschutz members at work

Cutlery twisted by the Firestorm

Diagram of a British 500lb High Explosive Bomb

Our final set of three photos show female Luftschutz wardens disposing of British incendiary bombs in an article taken from a contemporary publication. The second image is another view of some cutlery twisted into fantastic shapes by the intense heat of the Firestorm - these items were found buried in the ground surrounding the bunker, whilst the final shot is a diagram of a British 500 lb High Explosive bomb, from one of which the large piece of shrapnel on display inside the museum is taken.

On my next visit to Hamburg, I will visit the Museum again in order to purchase some more archive images so as to produce some 'then and now' comparisons from the neighbourhood to show just how the area was altered almost beyond recognition by the Firestorm.

In the meantime, thanks again to Gunnar Wulf for guiding our group around this excellent museum and for ensuring that the people of Hamburg remain aware of this terrible page in their past history.

Published Sources:

Inferno: The Destruction of Hamburg 1943 - Keith Lowe, Penguin Viking 2007