|
| Gotha bomber (author's collection) |
Perhaps less well-known than the Zeppelin raids on London during the First World War were the raids carried out by conventional aircraft, most notably by Gothas, large twin engine bombers that could carry a sizeable (for the time) bomb load of fourteen 25 kg bombs. The aircraft's range was also impressive for the time; at 840 kilometres, this meant the Gotha could easily reach London and return to their bases located around Ghent in German-occupied Belgium.
The threat posed by Zeppelin raids on London appeared to have been largely defeated, for the time being at least by the late autumn of 1916 and although raids continued sporadically until October 1917 and the threat of enemy air attack was still clear, the British took a remarkable decision to reduce London's anti-aircraft defences in order to redeploy the available manpower to the Western Front. Anti-aircraft gun defences were reduced in number and two fighter squadrons were redeployed to France. Furthermore and even more remarkably, anti-aircraft guns were ordered not to open fire - even if aircraft were confirmed as hostile - except for specified guns at coastal locations.
It was against this background of reduced British defences that the first Gotha raid on London was planned by the Luftstreitkrafte (Imperial German Air Service) for the 25 May 1917. Twenty three Gothas set off, led by Hauptmann Ernst Brandenburg but thick cloud cover saved the capital on this occasion and the formation was forced to turn back for home, although some secondary targets in Kent were bombed instead. Folkestone and an Army camp at Shorncliffe were the main recipients of the bombs originally planned for London and some 95 people were killed, with a further 195 seriously injured.
Given the reductions in the anti-aircraft defences and the apparent complacency that the German aerial threat had been defeated,the British response to this first raid was predictably confused and ineffective. Only some of the specified coastal anti-aircraft guns had opened fire and although some seventy fighter aircraft had taken to the air, only one got close enough to engage the enemy - without success. Royal Navy aircraft based in the Dunkirk region did manage to intercept the raiders as they returned home and claimed one Gotha shot down into the sea, whilst another crashed on landing near to Bruges, with the loss of the crew.
The British public were outraged by this muddled response and makeshift arrangements were put in place to ensure that training squadrons and experimental units made aircraft available and anti-aircraft observers were placed on lightships in the Thames Estuary to give a measure of early warning. Discussions about introducing an air raid warning system took place but at this stage were inconclusive. During the Zeppelin raids, no warning system had been in place in London and during this period, humorous postcards had circulated, with place names altered to suit the localities concerned that showed members of the public on the look out for the raiders.
 |
| Looking for Zeppelins at WOOLWICH (Royal Arsenal History Group) |
Updated versions of these now appeared, with the word "Zeppelin" substituted by "Gotha" but with the same message.
 |
| Looking for Gothas at PLUMSTEAD (Deborah O'Boyle) |
A second raid was attempted on 5 June but was once again thwarted by the weather. The British response was largely similar to the first raid; fighters despatched to intercept struggled to reach the raiders in time, although the anti-aircraft guns around Shoeburyness and Sheerness did manage to bring down one Gotha, which crashed into the Thames Estuary, with the loss of all but one of the crew.It was inevitable that a Gotha raid would succeed in reaching London sooner or later and on 13 June 1917, it was to happen. Twenty aircraft originally departed from the airfields around Ghent but two were to turn back with engine problems. The remainder continued, with one aircraft peeling off to bomb Margate, on which it dropped five bombs before returning to base, whilst a further two diverted to Shoeburyness where they dropped six bombs, before they too headed home. Yet another aircraft followed the Thames towards Greenwich on a photo reconnaissance mission, whilst the remaining fourteen continued towards London.
Although the anti-aircraft batteries had by now been given permission to fire, locating the targets in the hazy morning skies proved difficult and shortly after 11:30, the first bomb fell harmlessly on an allotment in Barking. Further bombs fell in East Ham, with one in Alexandra Road damaging 42 properties and more importantly, killing four people and injuring a further eleven. Another bomb fell by the Royal Albert Dock, where eight dock workers were killed.
 |
| PC Alfred Smith remembered at Postman's Park (author's photo) |
Bombs fell on Liverpool Street Station, where sixteen were killed and a further fifteen injured. Not far from here, in Central Street, PC Alfred Smith was able to save the lives of several female factory workers by preventing them from rushing into the street to witness the commotion. Sadly, at the moment he was urging the women to remain inside, a bomb exploded in the street and killed him instantly. PC Smith is today remembered on the Memorial to Heroic Self-Sacrifice at Postman's Park, in the City of London, as well as on a commemorative plaque in Central Street at the site of the original incident.
 |
| PC Alfred Smith plaque in Central Street (author's photo) |
As the aircraft turned for home, those with bombs still onboard unloaded them over the East End and it was at this time that the most tragic incident from this raid occurred; a 50kg bomb fell on Upper North Street School in Poplar, killing eighteen children, most of whom were under six years of age.
Again, the British response had been ineffective; 94 aircraft had been launched to intercept the raiders, of which just eleven made contact, all without success. The anti-aircraft guns had opened fire but again without hitting anything. All of the Gothas returned safely to their bases, leaving behind them 162 dead and a further 426 seriously injured - the highest casualty total of any raid during this war.
The British public were once again outraged at the lack of response and there was also a clamour for reprisal raids on German cities. Major General Hugh Trenchard, commander of the Royal Flying Corps on the Western Front, agreed to detach two front line squadrons to home defence but attempts by Lt. Colonel Simon, in command of London's anti-aircraft defences, to bolster his batteries by an additional 45 guns were rejected because neither the guns or the men to provide the crews were available!
The second daylight raid on London came on Saturday 7 July 1917 and consisted of 22 Gothas, commanded by Hauptmann Rudolph Kleine. Observers on board the Kentish Knock Light Vessel were able to transmit a warning, which enable fighter aircraft to be airborne in time to intercept the raiders but none were able to cause any serious problems to them. On the ground, observers likened the large enemy formation to a flock of birds, moving slowly across the skies.
The anti-aircraft guns opened fire at 10:21 but despite what appeared at least to onlookers on the ground as an impressive barrage, the Gothas emerged unscathed, although their previous tight formation was opened up as the bombers began to evade the gunfire. The first bomb fell on Chingford, without causing casualties, as was also the case in Edmonton and Tottenham. The first human casualties occurred in Stoke Newington, where ten people were killed, including a 12-year-old boy and ironically, a naturalised German baker and his wife, who died whilst working in their shop. More bombs fell on the City of London, most notably on the roof of the Central Telegraph Office in St Martin-le-Grand and also around Leadenhall Street, Fenchurch Street and Billingsgate Fish Market.
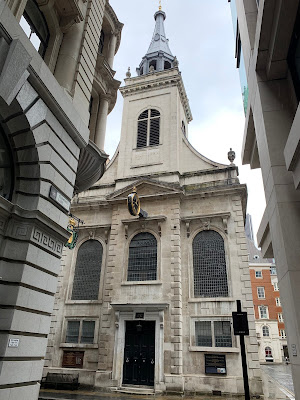 |
| St Edmund King & Martyr (author's photo) |
Evidence of this raid can still be seen in the Square Mile at the church of St Edmund, King & Martyr, which in its present incarnation dates from 1670-79 to the design of Sir Christopher Wren. The church today contains a peculiar square window in the roof which is out of square to the remainder of the building. This marks the entry point of a bomb from the raid of 7 July, which fell through the roof but which failed to explode fully. Fragments of the bomb are on display beneath the altar in what is probably the only place in London where remnants of a bomb can still be found in the building on which the bomb was originally dropped.
 |
| Entry point of the bomb, now an unusual window (author's photo) |
 |
| Fragments of the bomb beneath the altar (author's photo) |
Another bomb exploded at Tower Hill outside an office building, inside which some eighty people were sheltering. The blast from the bomb killed eight and injured fifteen of those inside as well as injuring three horses outside in the road. In what must have been horrific scenes, a fireman used his axe to put the horses out of their misery. The final bombs fell at 10:40 in Whitechapel and when the dust had settled, another 54 Londoners had died as well as another 190 injured. The raiders didn't have things all their own way on their way back to base though; one Gotha was brought down in the North Sea by an aircraft from 50 Squadron piloted by Lieut FAD Grace, whilst another was forced down on to the beach at Ostend. Three others were wrecked on their airfields due to a combination of battle damage from British fighter aircraft, lack of fuel and strong winds.
Reaction amongst the British public to the raid was strong, especially when it became apparent that the two squadrons that had been temporarily detached by Trenchard had in fact returned to the Western Front hours before the raid commenced and further frustration was expressed at the continued lack of effectiveness of the anti-aircraft guns, shells from which had fallen on the city, adding to the list of civilian casualties.
A committee was therefore formed to consider revised Home Defence arrangements under the chairmanship of Lieut. General Jan Christian Smuts, who effectively dominated the entire committee. Having interviewed all of the senior figures involved, he produced a report after only eight days which recommended that a single officer be placed in command of all facets of air defence for the London area, bringing the RFC, anti-aircraft guns and observers under a unified command. The question of providing an air raid warning was finally addressed, when it was decided that maroons would be fired to warn of incoming daylight raids, together with police alerts which would be provided at all times. The man chosen to command the new London Air Defence Area (LADA) was Major General Edward Ashmore, a former senior officer in the RFC.
Fortunately for Ashmore, the English weather provided an opportunity for him to reorganise London's defences; the remainder of July into August saw rain and high winds, which effectively ensured that enemy raiders could not reach the capital. A raid attempted against Chatham on 12 August ended with one Gotha shot down into the sea, another forced down near Zeebrugge and a further four wrecked in landing accidents. A further attempted raid on 18 August against coastal towns in southeast England resulted in nine aircraft being lost to a combination of Dutch anti-aircraft fire (when high winds drove them over that neutral country), shortage of fuel and crash landings. A further similar raid on 22 August by the remaining fifteen Gothas saw three of them shot down by the British coastal anti-aircraft guns, with the remainder driven back by a determined defence by Royal Naval aircraft.
As a result of these failures, it was decided to switch to night bombing and an attack on Margate, Sheerness and Chatham on the night of 3/4 September yielded spectacular results for the Gothas. Two bombs fell on a drill hill at the Chatham Royal Naval Barracks, killing 138 ratings. Eleven Gothas returned to London the following night and evidence of this raid can still be seen to this day. At around midnight, a 50 kg bomb exploded in the roadway at Victoria Embankment by Cleopatra's Needle, just as a late night tram was passing. The blast killed the tram driver, Alfred Buckle and two passengers, whilst throwing the conductor Joseph Carr from one end of the tramcar to the other.
 |
Cleopatra's Needle showered with splinter damage and an explanatory plaque on the plinth (author's photos)
|
Again though, the Gothas hadn't had things their own way; of the eleven originally despatched, two had already returned with engine trouble, whilst another was shot down by an anti-aircraft gun near Rochester and crashed into the Thames Estuary. Of the eight survivors, it was thought that only five actually reached London to drop their bombs. Apart from the Victoria Embankment, other bombs fell in West Ham and Stratford, Greenwich and Woolwich as well as the Strand and near Oxford Circus.
The next raid came on the night of the 24 September when sixteen Gothas set out for London. As usual, the inevitable engine problems saw three of the bombers turn back but the remaining thirteen crossed the English coast between Orfordness and Dover. Some thirty RFC aircraft were sent up to intercept and although they did not succeed in bringing any raiders down, perhaps they acted as something of a deterrent as only three of the Gothas actually reached London, with the remainder dropping their bombs in Dover and other coastal targets in Kent and Essex. One Gotha dropped its bombs in Poplar, before crossing the Thames to drop four more on Deptford and Rotherhithe before heading for home. Onlookers on the ground were impressed by the intensity of the new anti-aircraft gun barrage and it was probably this that caused the raider to drop its bombs early. Of the two that reached Central London, we can again see evidence of their presence today.
 |
| Plaque outside the Bedford Hotel, Southampton Row (author's photo) |
A bomb that fell by the Bedford Hotel in Southampton Row killed thirteen and injured a further 22. In total fourteen Londoners lost their lives in this raid and 49 were injured. One of the Gothas that reached London crashed on landing in Belgium and combined with those that had been driven back earlier, it was looking as if the improved defences were beginning to make a difference.
Fifteen Gothas returned the following night, 25 September and this time there was only one drop out due to technical issues. Most settled for targets along the coast, such as Folkestone and Margate, with only three reaching south east London. Bombs fell on Blackheath, Charlton, Deptford, New Cross and the Old Kent Road. Four people were killed and a further fifteen injured but once again, the improved defences had appeared to make the difference.
The raids would continue for the remainder of 1917 but from 29 December, a new type of aircraft - the RV1 "Giant" would enter the fray and we shall take a look at these next time.
Published Sources:
The First Blitz: Bombing London in the First World War - Ian Castle, Osprey, 2015
The Lost Treasures of London - William Kent, Phoenix, 1947
Unpublished Sources:
London Fire Brigade Reports 1915 - 1918